Live Photos: The ultimate guide
The idea of moving pictures isn't new (any Harry Potter fan will tell you that!) but thanks to Live Photos, everyone can take and share them!

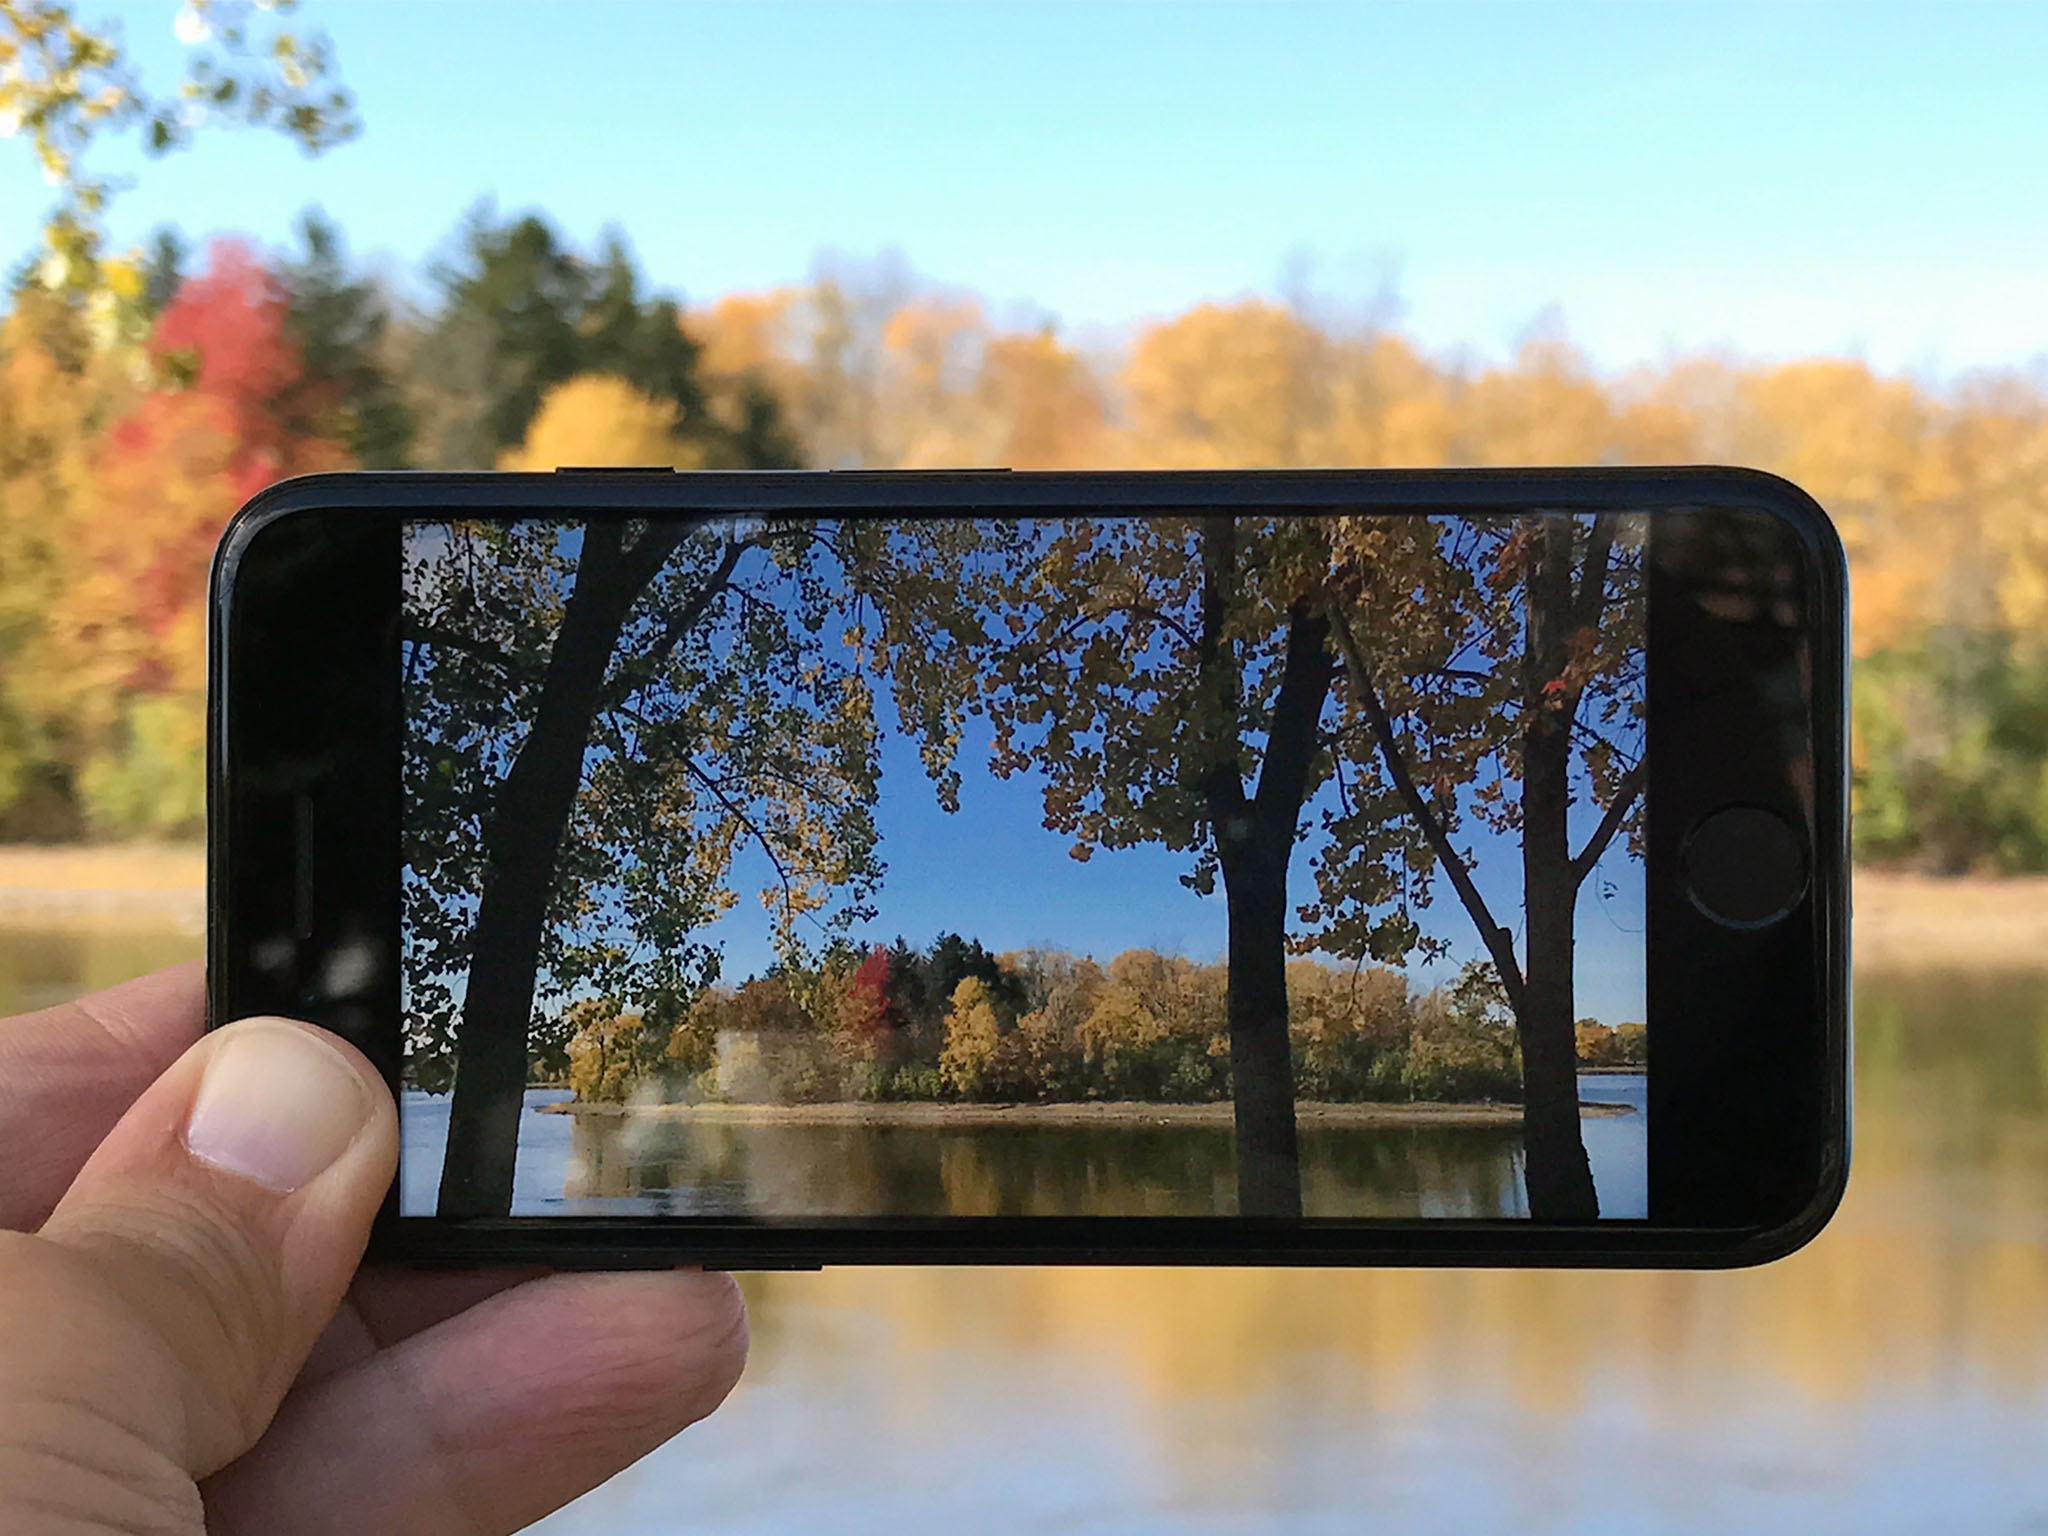
Live Photos aren't quiiiite video, but rather a full-on 12-megapixel photo that animates 1.5 seconds of motion before and after the still. Super cool, right?!
You can take them with any iPhone from the iPhone 6s onward, as well as iPad Pro.
- How to take a Live Photo with your iPhone or iPad
- How to view Live Photos on newer iPhone models
- How to view Live Photos on an older iPhone, iPad, or iPod touch
- How to share Live Photos on your iPhone or iPad
- How to set a Live Photo as the wallpaper on your iPhone 6s or Apple Watch
- How to extract a still shot from a Live Photo
- How to turn a Live Photo into a GIF
How to take a Live Photo with your iPhone or iPad
Live Photo can easily be turned on and left on, or turned off and only turned on when you expressly want to use it — which is a great option if you're looking to save the battery and some space on your iPhone.
Since Live Photos (which combine a 12-megapixel JPG image with a ~15FPS MOV file) take about about twice the amount of storage, and require you to keep the camera relatively still for three seconds, both your storage and patience might lean you towards the latter approach.
The important thing to remember is that a Live Photo is not a movie. It doesn't start when you hit the shutter. Instead, it grabs the photo.
Think of it this way: the moment you hit the shutter is the mid-point of your live photo, the still that's wrapped in animation before and after. Grasp that, and your Live Photos will turn out just the way you want them!
- Launch the Camera app from your Home screen.
- Tap the Live Photo button, top center (looks like a set of diffusing rings) to toggle it on (yellow).
-
Tap the Shutter button to take your Live Photo.
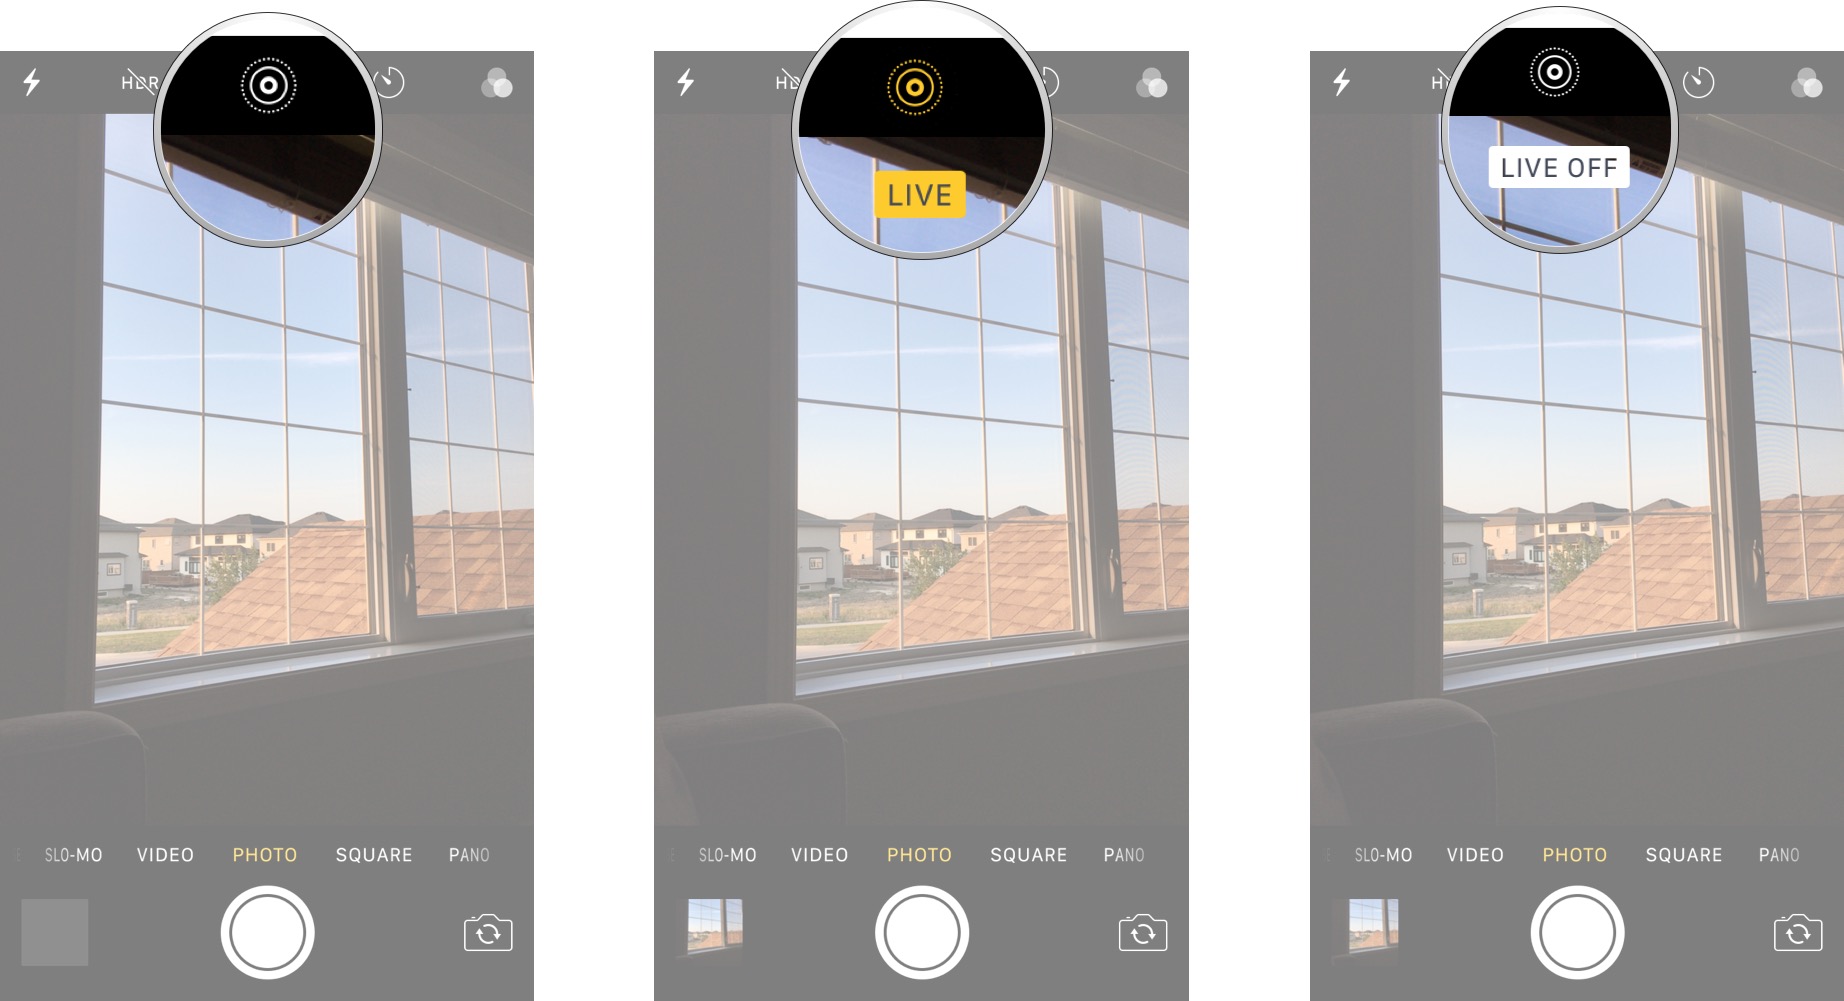
The Live Photo icon will animate with a brief ripple and a yellow LIVE label will pop up to briefly alert you that it's on. A white LIVE OFF label will briefly alert you when it's not on.
How to take a Live Photo in FaceTime on iOS 11 and macOS High Sierra
How to view Live Photos on a newer iPhone model
Viewing a Live Photo on one of Apple's current-generation iPhone models (iPhone 7 and iPhone 7 Plus) is easy-peasy!
- Launch the Photos app from your Home screen.
- Find the Live Photo you want to view.
- Press firmly on the photo to animate it.
It'll blur for just a second and then start to play.
How to view Live Photos on an older iPhone, iPad, or iPod touch
If someone who can take a Live Photo sends or shares one with you, as long as you have an iPhone or iPad — even an older one that can run iOS 9 or later — you can still watch it come to life.
- Find the Live Photo you want to view.
-
Touch and hold the photo to animate it.

How to share Live Photos on your iPhone or iPad
You can share your Live Photos right from the standard iOS Share sheet. Here's how!
If your social service of choice currently doesn't support Live Photos, here's how you can share them elsewhere.
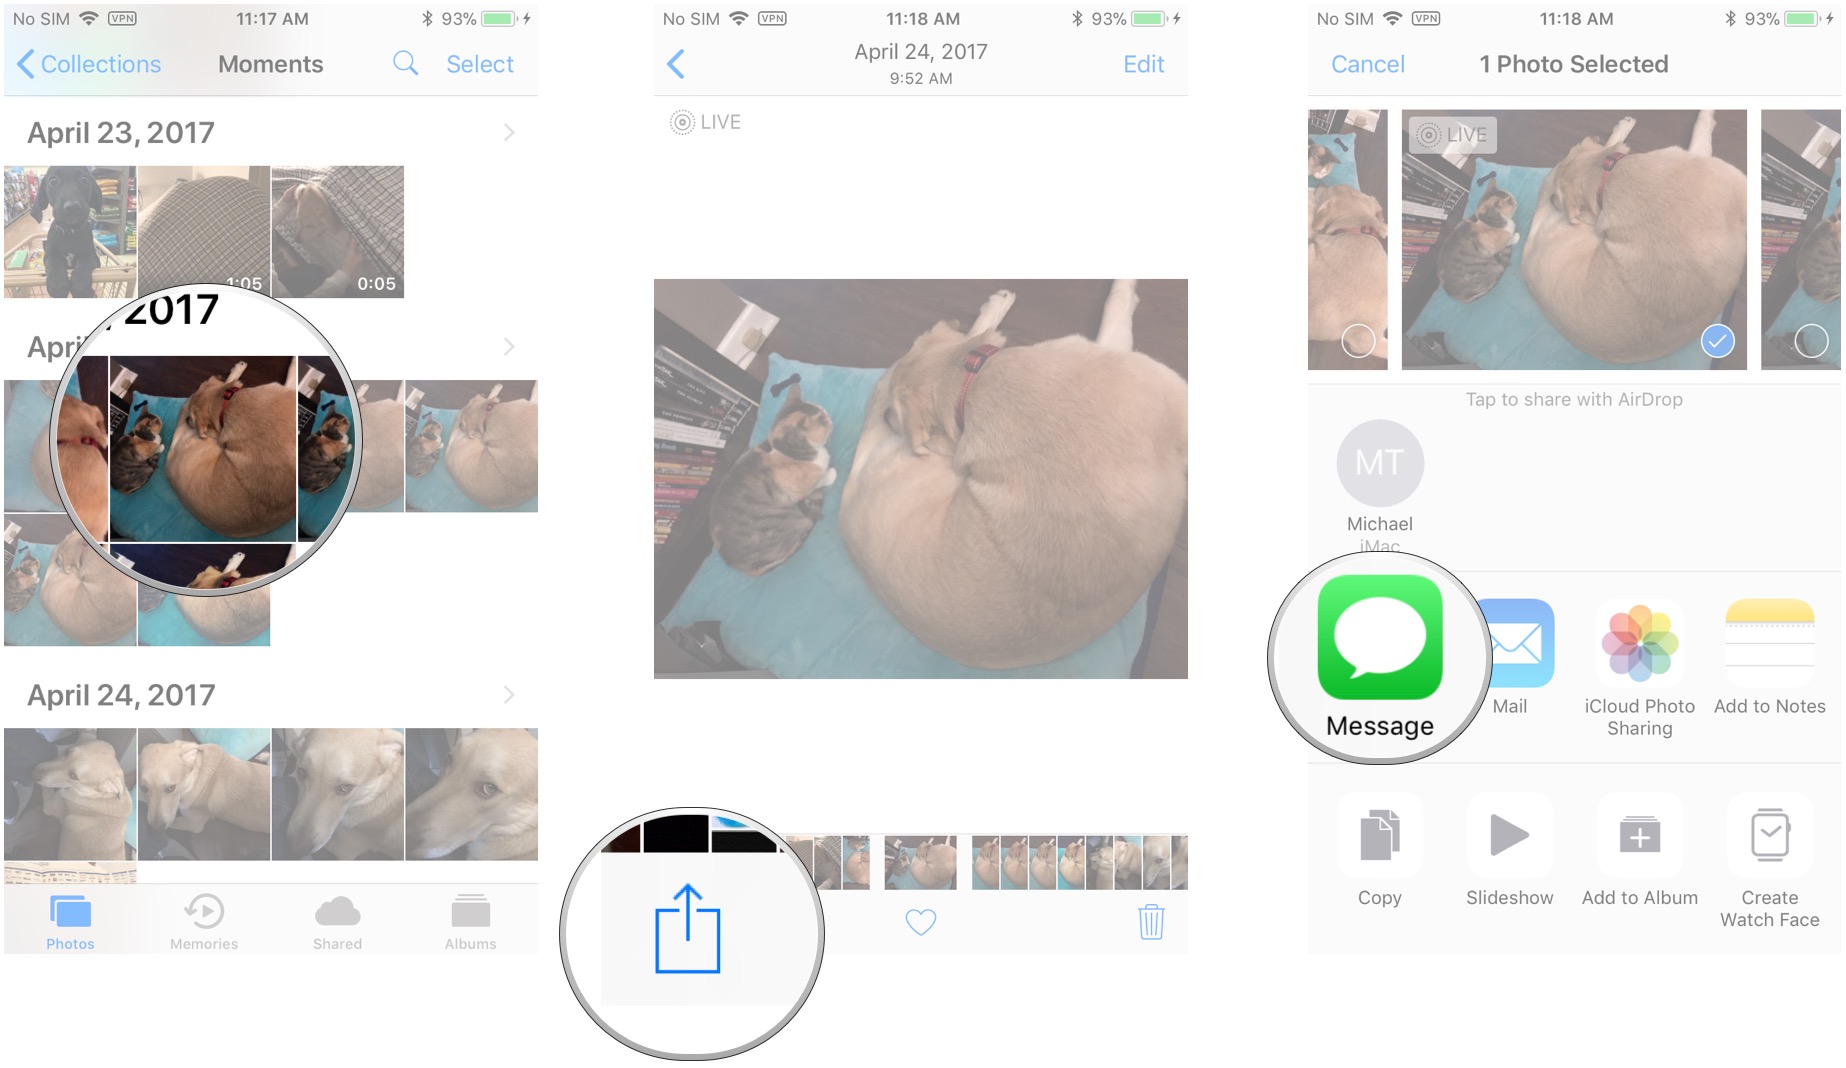
- Launch the Photos app from your Home screen.
- Find and tap the Live Photo you'd like to share. If a photo is a Live one, you'll see a gray "Live" indicator in the upper left of your screen.
- Tap the Share button on the bottom left of your screen. It's a box with an upward-pointing arrow.
- Tap a sharing method. You can share to just about any social media platform, and you can even share your GIFS to YouTube.
-
Follow the on-screen prompts to share it like you normally would with the method of your choice.
How to set a Live Photo as the wallpaper
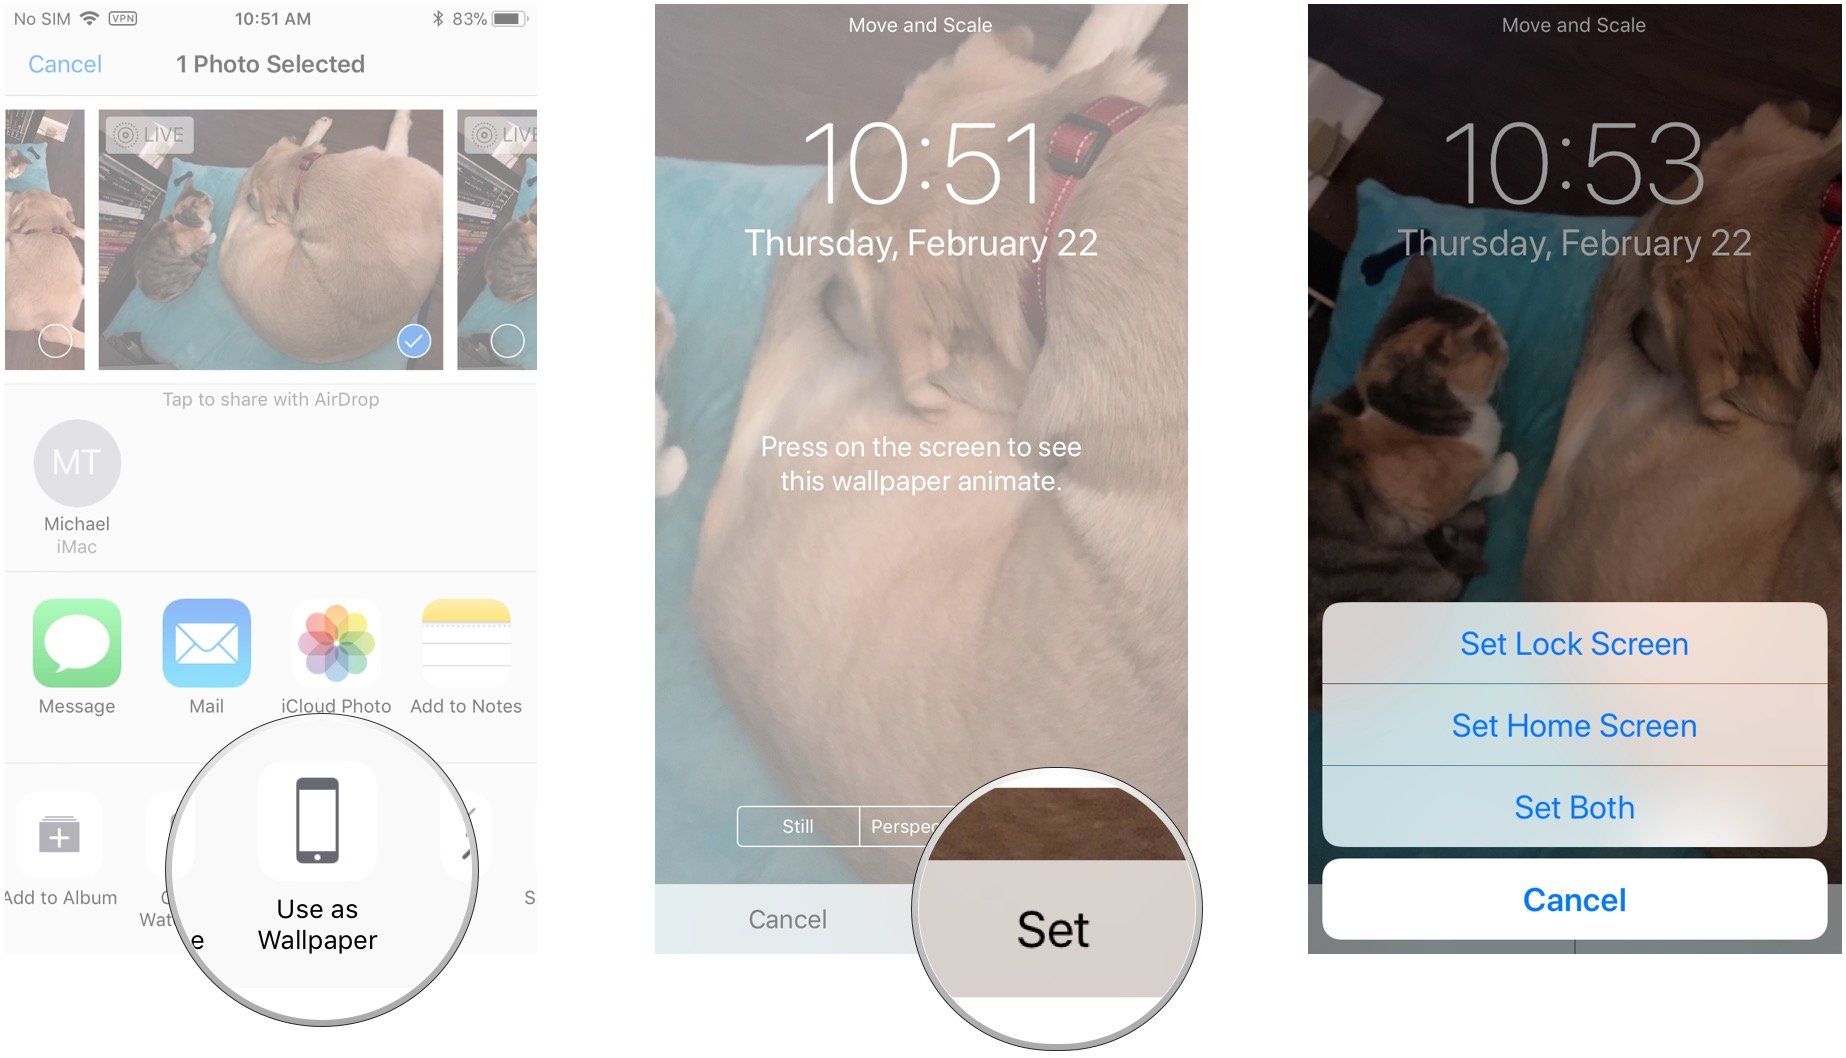
You can set Live Photos as your wallpaper on iPhone 7 or later or as a clock face on Apple Watch, which works especially well for loved ones, children, pets, and landscapes.
Note: iPhone SE and the 9.7-inch iPad Pro, which can take Live Photos, don't have 3D Touch or Force Press, and can't activate them on the Lock screen.
- Launch the Photos app from your Home screen.
- Find the Live Photo you want to use as your wallpaper.
- Tap the Share button.
- Tap the Use as Wallpaper button.
- Tap Live Photo on the lower right of your screen if it's not already selected.
- Tap Set. You can't adjust the size of a Live Photo wallpaper.
-
Tap Set Lock Screen, Set Home Screen, or optionally Set Both.
How to extract a still shot from a Live Photo
If you want the photo without the live, you can make a copy that gives you just that. (You can also export Live Photos as GIFs, if you want the live without the photo!)
- Open the Photos app.
- Select the Live Photo you want to extract a still shot from.
-
Tap the Share icon in the bottom left corner of the screen.
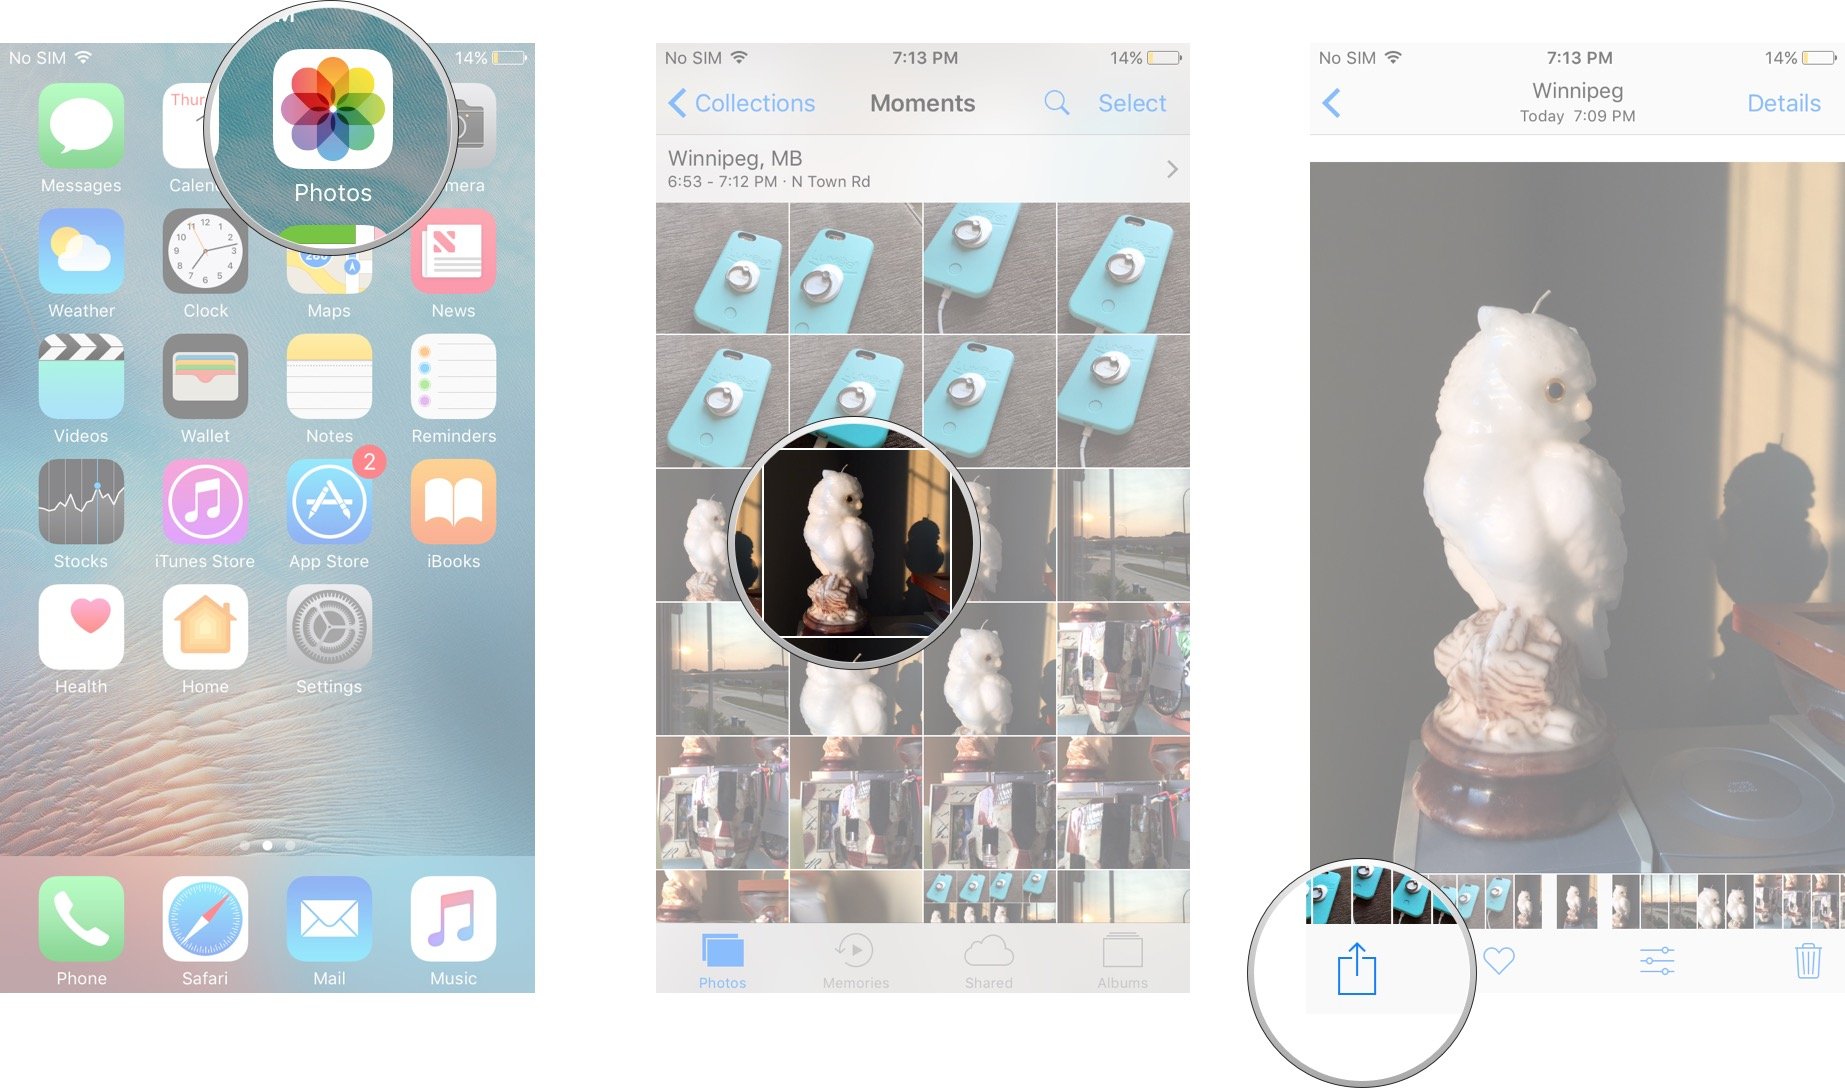
- Tap Duplicate in the option tray at the bottom of the screen.
-
Tap Duplicate as Still Photo.
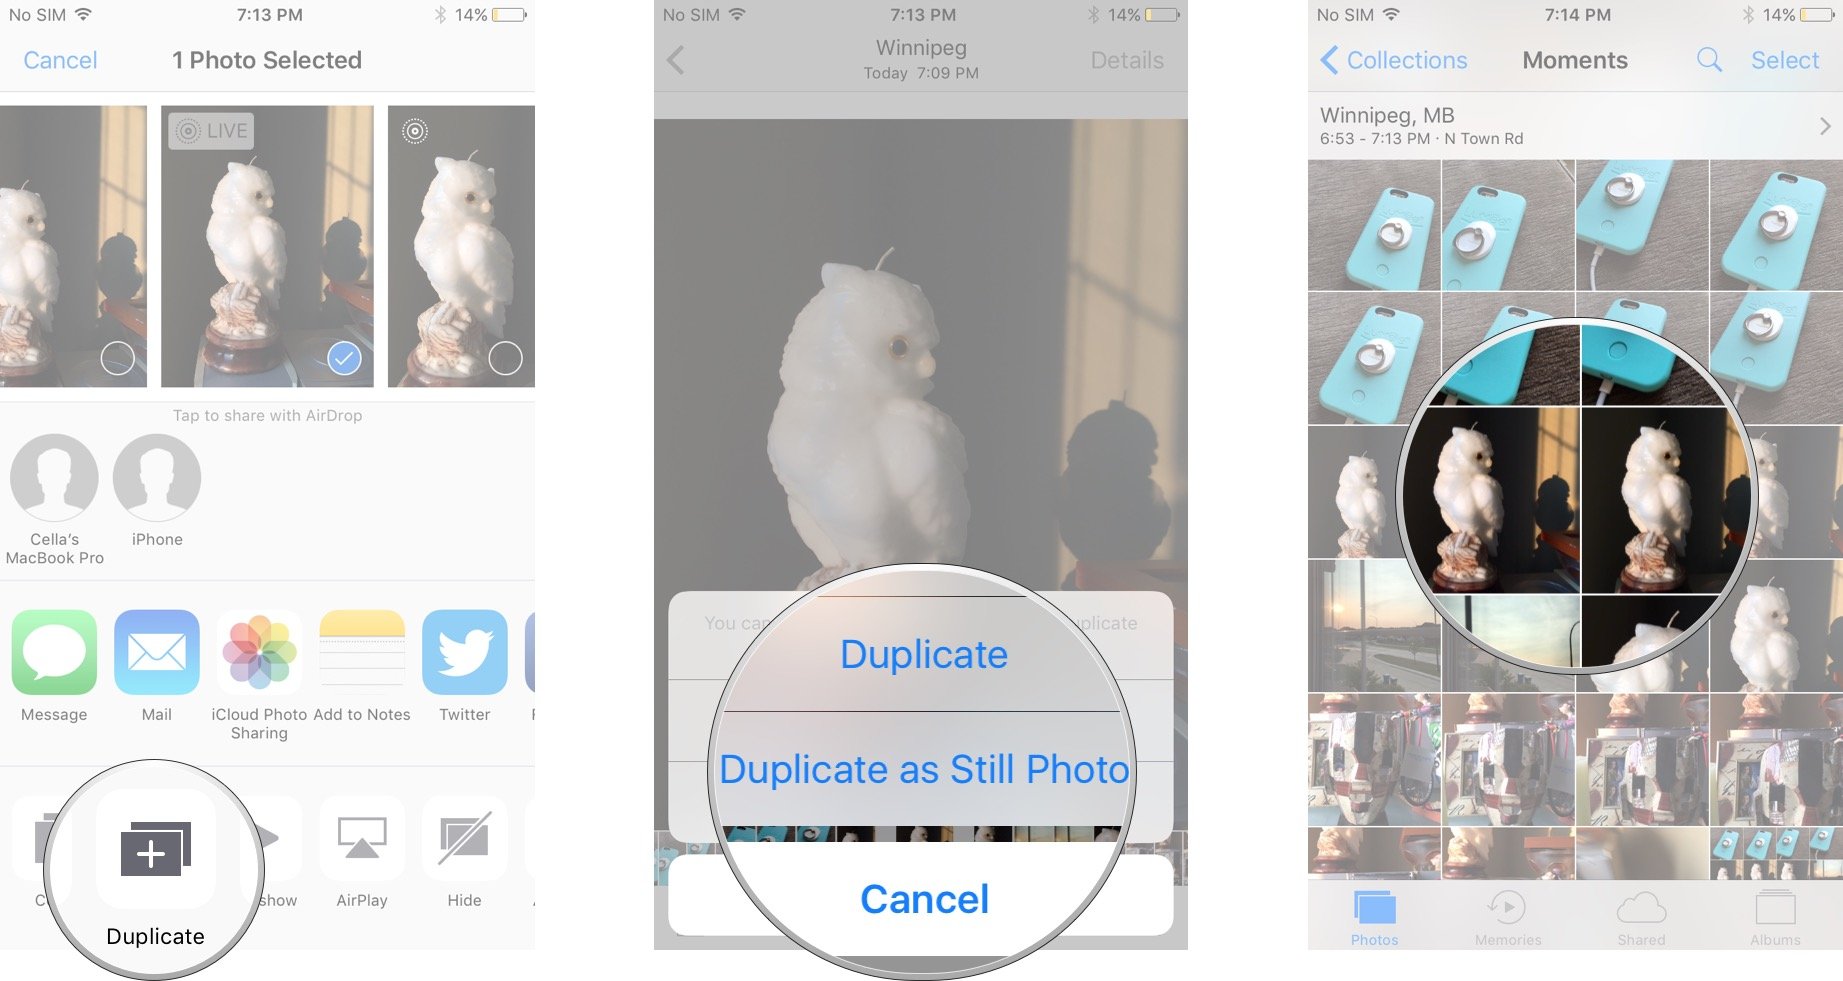
A copy of the still photo will appear in your library right next to the original Live Photo. You can delete the Live Photo if you no longer want it to take up storage on your iPhone.
How to turn a Live Photo into a GIF
With iOS 11, there's no longer any need to connect your iPhone to your Mac and go through the rigmarole of picking a GIF creator app. You can do it all right in the Photos app!
- Launch the Photos app from your Home screen.
- Find and tap the Live Photo you'd like to turn into a GIF.
- Swipe up on the center of the screen to reveal the animation options.
-
Tap Loop if you'd like to loop the Live Photo as a GIF. You can also choose to "Bounce" it á la the Boomerang app for Instagram.

You'll then be able to find your GIF in the Animated album in the Photos app.
How to use Giphy to turn GIFs into Live Photos
Questions?
Let us know in the comments below!
Updated February 2018: Updated screenshots and steps for all the latest for Live Photos and added all of our Live Photos how-tos into this one ultimate guide!
iPhone photography

- How the iPhone X camera and Slow Sync Flash work
- How to use Portrait Lighting
- Camera tests: TrueDepth Portrait vs Rear Portrait
- Tips for shooting great Stage Light Portraits
- Ten tips for taking great iPhone photos
- Camera app: The ultimate guide
- Photos: The ultimate guide
- Best manual camera apps that shoot RAW for iPhone
from iMore - Learn more. Be more. http://bit.ly/2FrJIuk
Powered by IOSCUBE


No comments: