Thursday, 31 May 2018

Best External Heart Rate Monitors for iPhone and Apple Watch

What external heart rate monitor should you get for your Apple Watch or iPhone?

The Apple Watch has an excellent oximeter-based heart rate monitor for tracking your day and basic workouts, but it's not perfect for more endurance or weight-based activities.

For one thing, that monitoring comes at the expense of battery life: The smartwatch's health sensors account for a large majority of battery drain; as such, Apple limits how often the sensor records data, even during workouts. At rest, you'll get heart rate data every ten minutes; during a workout, you're likely to get recordings every 10 seconds to a minute.

The wrist-based monitor can also get tripped up if you tend to do a lot of exercises involving wrist bending or quick movement — the oximeter works by measuring the movement of your blood using light, and when you flex your wrist, you can momentarily change that circulation, leading to erroneous heart readings. (If you've ever seen an Apple Watch reading of "65bpm" or lower or a grey number when you're in the middle of a high-intensity workout, that's likely what has happened.)

If you're worried about your Apple Watch's battery life during a lengthy workout (like a marathon, for instance), or you'd like more consistent and quick readings, consider pairing it to an external heart rate monitor: These Bluetooth accessories often run off quick charges or watch batteries and offer faster readings from a location with better circulation (like the chest or upper arm). And if you don't have an Apple Watch at all, you can use external monitors with your iPhone to get valuable heart rate data.

We've tested several Bluetooth heart rate monitors, and here are our favorites.

Scosche Rhythm+ monitor armband

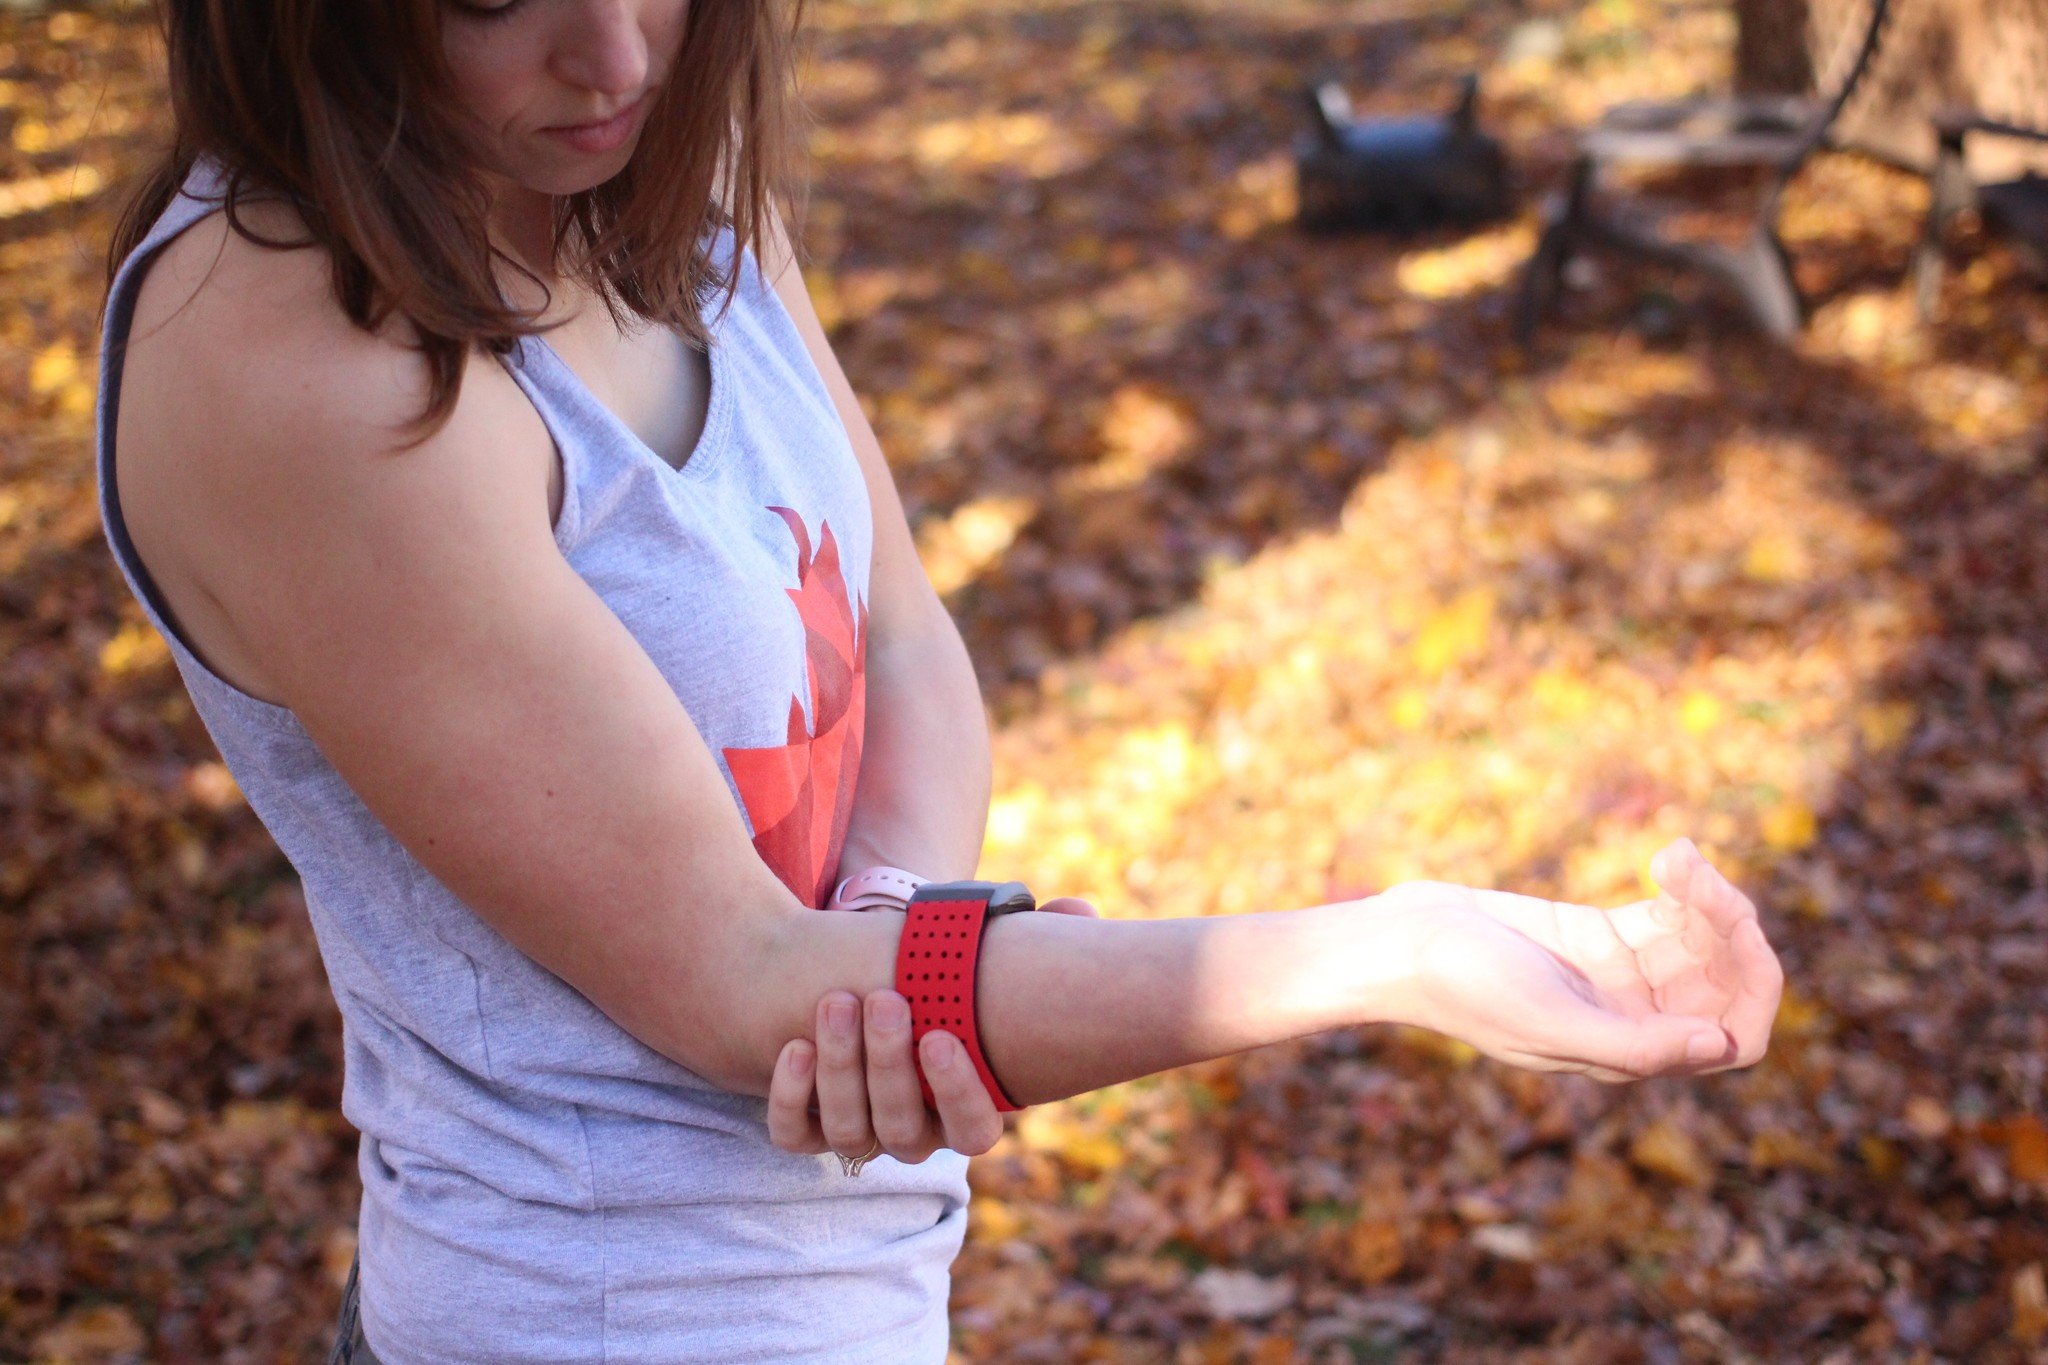
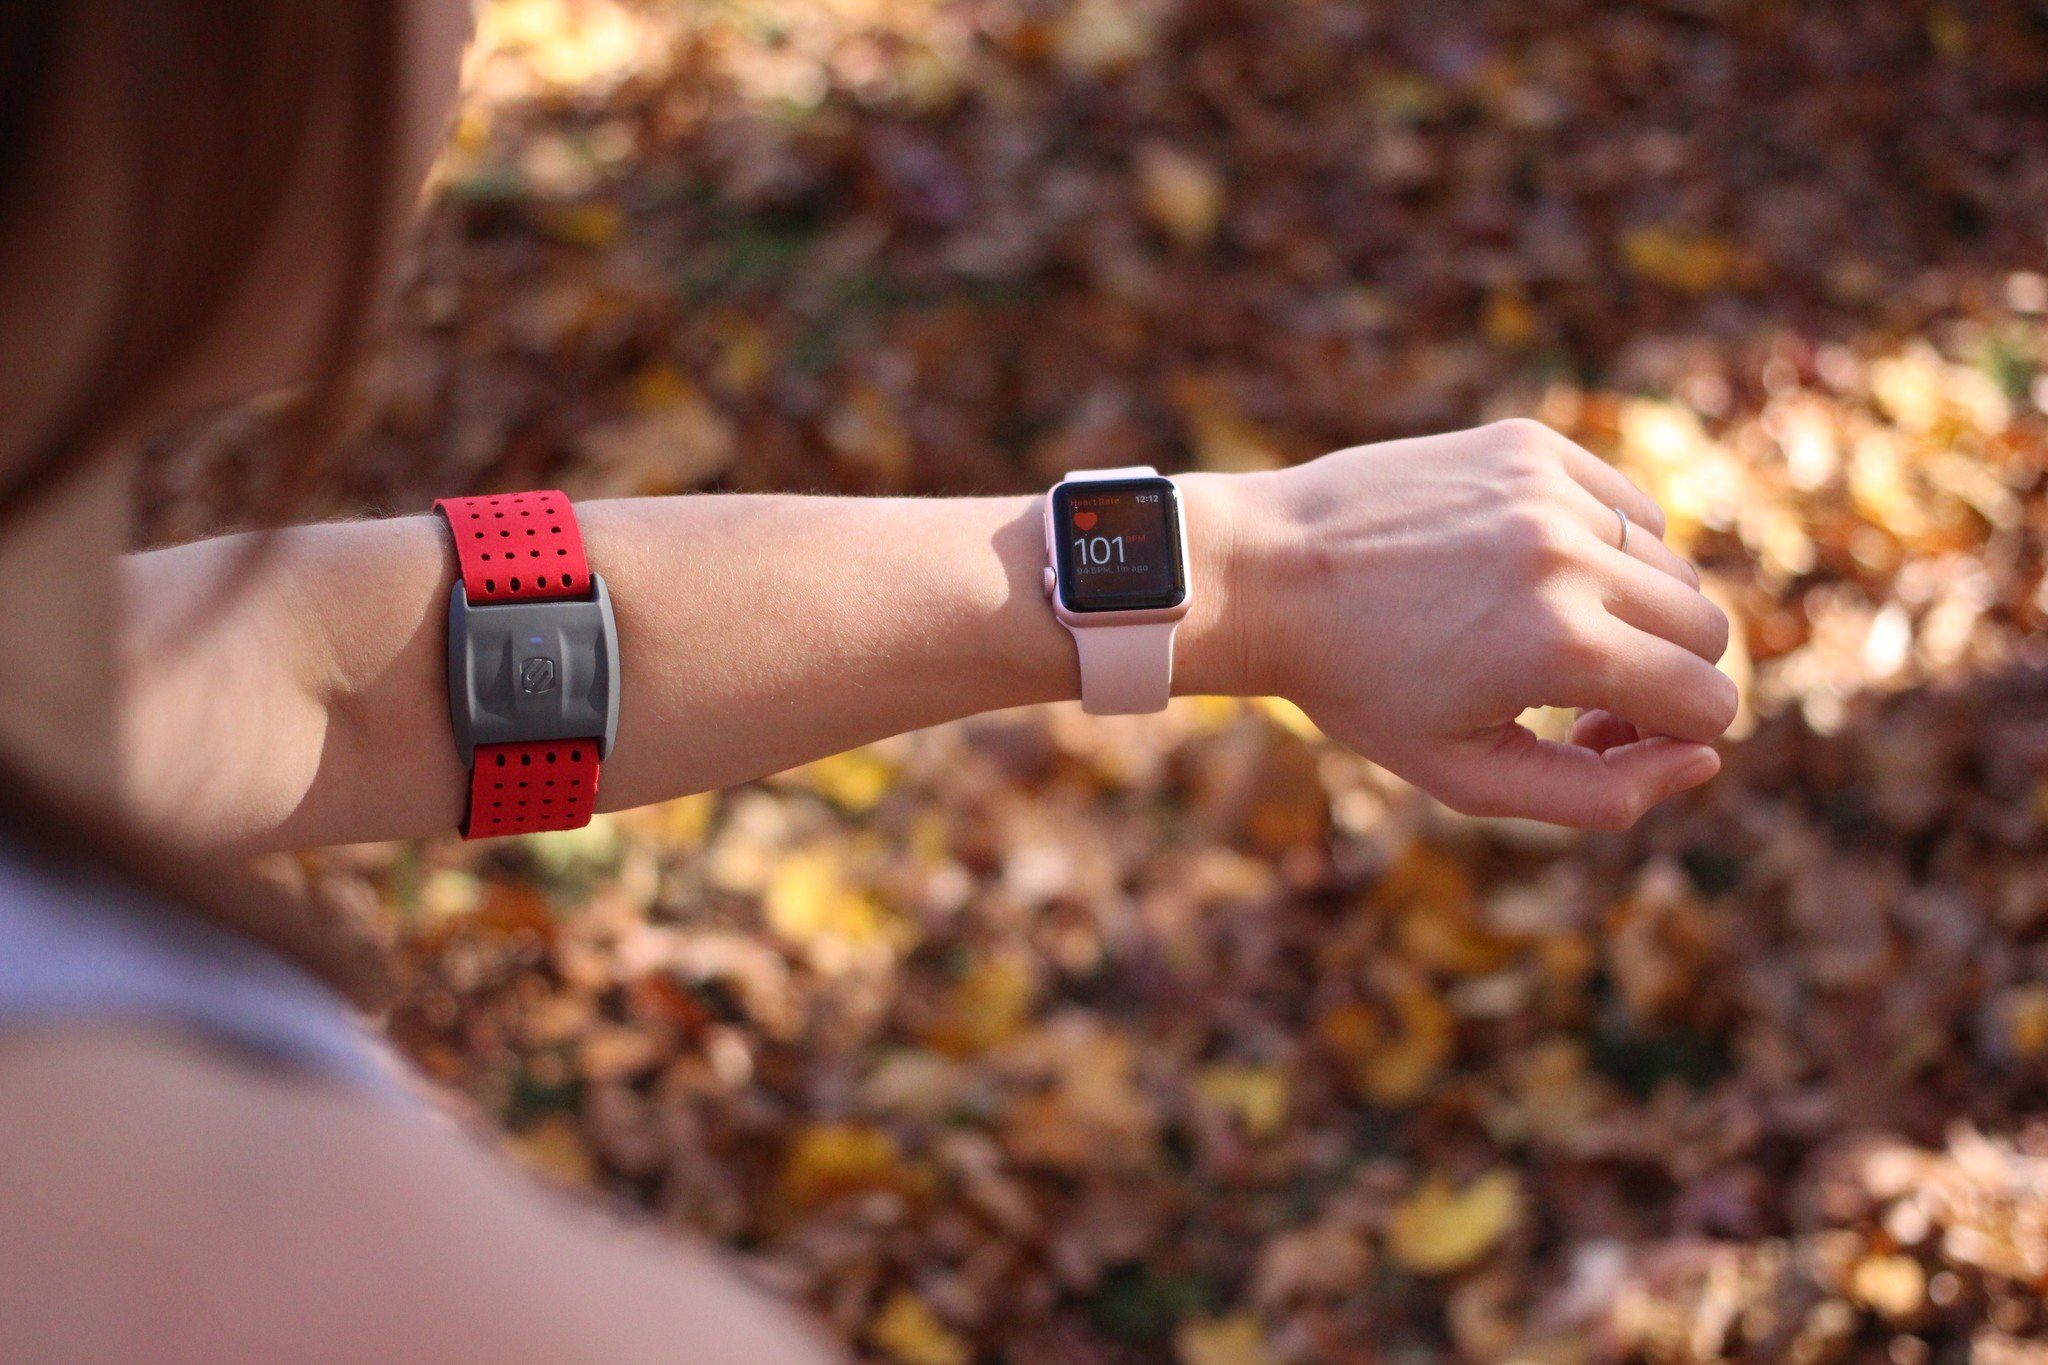
If you're looking to get better heart monitoring without going full in on the chest strap look, Scosche offers a forearm-monitoring option in the Rhythm+ armband. The water-resistant (IP67) device connects to an adjustable neoprene strap; while you can wear it anywhere on your arm, Scosche recommends the forearm. (I did my primary tests with it in that location, as well.) It uses an 8-hour rechargeable battery, so you can plug it in after workouts like you might with an Apple Watch.

Both the small grey tracker and strap are slim and stylish, given that you'll likely be wearing them in a visible location on your arm. You can slip a shirt on over the Rhythm+ if you want to hide it, but it's a nice enough looking tracker to leave it visible. It does look a little goofy when both the Apple Watch and tracker are on the same arm, but until we have magical nanobot implants, such is our connected device lifestyle.

In practice, it's significantly more comfortable than wearing a chest strap during heavy-duty workouts, while being about as accurate: The Rhythm+ uses green and yellow oximeter sensors (described as "PerformTek biometric sensor technology") to get a more precise look at your heart rate than the Apple Watch's green sensors alone, and records data much more frequently.

I wore the Rhythm+ for a week to my regular skating practices and weight training sessions; from those workouts, it proved significantly more accurate than my usual Apple Watch tracking. (I used Bluetooth to connect to the Rhythm, but it also offers ANT+ support for cyclists.) My only concern with the Rhythm+ was occasional tightness when doing arm-related exercises: Although the neoprene strap flexes slightly, it's not really designed to deal with major forearm or bicep flexion.

Unlike many of the other chest strap options, Scosche doesn't offer a dedicated app for viewing your recorded heart rate data; instead, you can look at it in Apple's Activity or Health apps, or download a third-party option like Cardiogram. You can grab this monitor off Amazon for around $80.

See at Amazon


Polar H10 Heart Rate Monitor

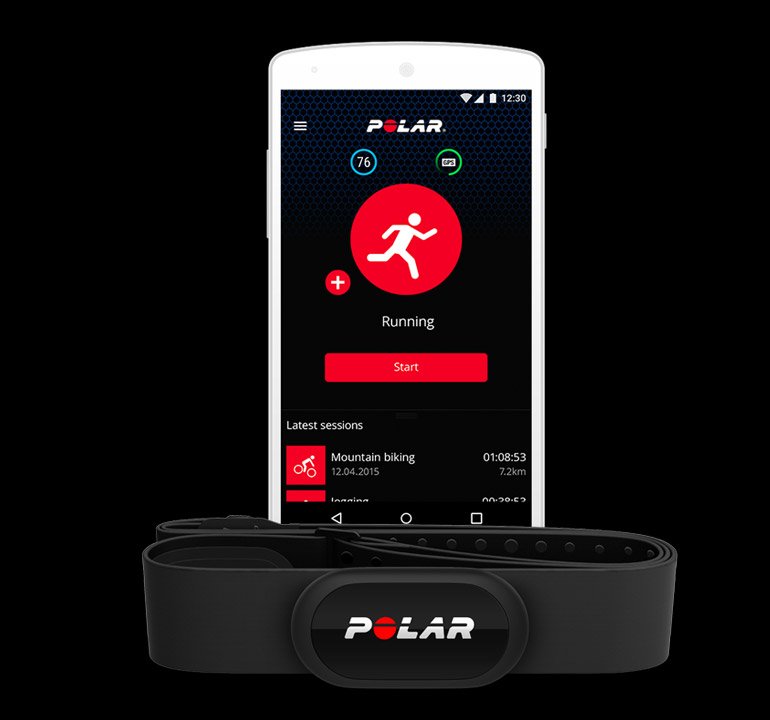
Even before the smartwatch age, Polar was a household name in the fitness monitoring industry, and for good reason: The company's technology has long provided accurate and speedy fitness tracking for athletes.

After a few years of offering Bluetooth users the aging H7 chest strap, the company has created a new tracker for iPhone and Apple Watch users: the H10 heart rate monitor. The water-resistant neoprene chest strap is slimmer and more comfortable than its predecessor, all the while still running off a single CR 2025 watch battery. Unlike the Rhythm's oximeter, the H10 offers electrode-based heart monitoring — it's more accurate, but requires more body contact.

The H10 connects to your iPhone or Apple Watch using Bluetooth LE, though you'll want to use one of Polar's apps to get Polar's specific readings. I used Polar Beat; it's not my favorite app (and requires an in-app purchase if you want to see your heart rate/fat burn breakdown), but it does the trick. Your heart tracking will also log in Apple's Health app after you connect it, allowing you to take your fitness data elsewhere. And if you're not near a connected device, the H10 has a small amount of onboard storage, allowing you log a workout even without your devices present.

Note: We've seen a number of users run into an issue where the H10 appears on the iPhone, but not the Apple Watch; to fix this, you'll want to pair the H10 to the Apple Watch first, before connecting it to your iPhone — or disable Bluetooth on your iPhone from the Settings app before attempting to pair with Apple Watch.

Polar's H10 was by far the most accurate of the fitness trackers I tried, but it does come at the expense of having to wear a chest strap. During a run or weight training session, this shouldn't bother you, but full-contact sports might be a bit much: For me, anything strapped to my chest in derby is a potential bruising hazard — and I've seen enough cracked sternums to want to avoid that fate at all costs.

You can pick up both the H7 or the H10 from Amazon starting around $63, though I'd recommend spending the extra $10 to get the H10. The slimmer form-factor definitely makes a difference in comfort, and the heart rate tracking regularly appeared more consistent — with fewer random dips — than its predecessor.

Polar H7 - See at Amazon

Polar H10 - See at Amazon

Wahoo TICKR X heart rate monitor

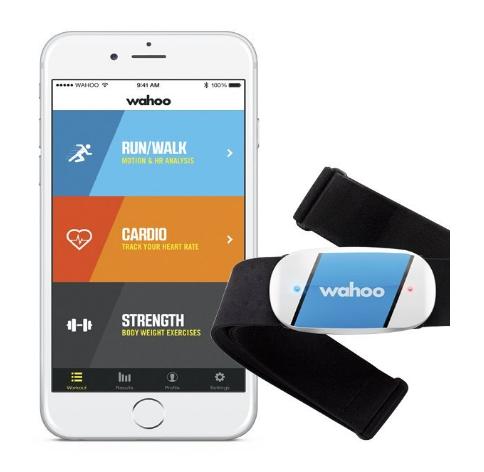
If you've looked at connected fitness options in the Apple Store recently, you might have stumbled across Wahoo's TICKR line — the electrode-based neoprene chest strap works very similarly to Polar's sensor, offering up to 16 hours of offline tracking, water resistance, a specialty app called RunFit for tracking your workouts, and a few additional analytics.

The biggest difference between the TICKR X and the Polar H10 is in these little additional options, largely for runners: The TICKR lets you track your stride, ground contact time, and vertical oscillation. It's also less water resistant, offering protection up to 5 feet versus the Polar's 30.

In my tests, I found the TICKR X slightly less reliable than the Polar H10, largely thanks to its RunFit app, which occasionally caused the TICKR to malfunction — there were several instances during a workout where it claimed my heart rate was up in the 170s (it was not). I also noticed occasional misfires on account of the vertical oscillation tracker — during Wahoo's 7 Minute Workout, it refused to log multiple exercises and reps on account of not seeing the movement. That said, the TICKR does have a friendlier look to both the workout app and overall experience; it markets itself as a Bluetooth chest strap for beginners, rather than Polar's fitness experts.

If you're not interested in those extra features, you can also save a good chunk of change by going for Wahoo's regular TICKR model: It skips out on running analytics sensors, rep counting, and built-in memory in favor of a focused heart monitor. Check out the TICKR for about $50 and the TICKR X for $79.

TICKR - See at Amazon

TICKR X - See at Amazon


Heart rate monitors on the horizon

There are three heart rate monitors I haven't tested yet, but are on my list to test soon:

  • Polar OH1: Released in September 2017 for $99, Polar's OH1 is an optical heart rate sensor designed to be worn around the arm, like the Rhythm+. It offers 12 hours of battery life, up to 200 hours of memory, and is water-resistant up to 30m — good for most swimming workouts.
  • Scosche Rhythm24: The successor to Scosche's Rhythm+ upgrades the monitor with a new design, 24-hour battery life, multiple training and use modes, heart rate variability mode, an LED battery indicator, and on-board data recording like Polar's monitors.
  • Wahoo TICKRFIT: An armband heart rate monitor from the makers of the TICKR line, the TICKRFIT (released in March 2018) offers a rechargeable 30+ hour battery and IP70 water resistance (up to 5 feet, or "splash proof").

What's your pick?

Do you have a heart rate monitor you prefer that you've been using with your Apple Watch or iPhone? Let me know!

Updated May 2018: These are the still best external heart monitors on the market for your Apple Watch, though we're hoping to test the newer entrants very soon.


from iMore - Learn more. Be more. http://bit.ly/2A1vAHh
Powered by IOSCUBE

PDF Viewer supercharges the native iOS 11 Files browser

PDF Viewer adds essential features to iOS 11's native Files browser, making it essential for any iPad or iPhone.

(via Cult of Mac - Tech and culture through an Apple lens)


from Cult of Mac http://bit.ly/2J4uGLR
via IFTTT

Belkin launches new 10W Boost Up Wireless Charging Pad and Stand with unique design for iPhone

Belkin has today made its newest 10W wireless chargers available, the Boost Up Charging Pad and Boost Up Charging Stand. The new offerings are available in three colors and the stand model brings a unique design to the market.

more…


from 9to5Mac http://bit.ly/2J51YKN
via IOSCUBE

Pokémon Quest: Tips and tricks

Up your Pokémon Quest game with these tips and tricks!

Are you looking for ways to up your Pokémon Quest game on Nintendo Switch? Don't worry about a thing. We have you covered. Here are some tips and tricks to help you become a Pokémon Quest master!

Power Stones

As you progress through the game you will collect various Power Stones. Depending on the type of stone, they can increase your hit points or your attack. There are also stones which can alter the powers which your Pokémon use in battle.

Make sure that you are consistently swapping out lower powered Power Stones for the new higher power stones you receive. This will ensure that you are always at the top of your possible power for your team.

Contrary to popular belief on the subject, bingo isn't just for grandmothers. Bingo is also for Pokémon. When you are slotting Power Stones into your Pokémon always try to slot three in a line whenever possible. If you slot three Power Stones in a row you will get a Bingo Bonus. Each Pokémon has a different bonus. In order to see the bonus, tap on the magnifying glass in the upper right corner. This will show you exactly what benefits you are receiving.

Cooking

As you probably know by now, cooking is a great way to attract new Pokémon. Simply go to your Base Camp, tap on the cooking pot, and start throwing in ingredients. Once you have played for a little while you will get access to a new pot. You can switch pots by tapping the cycle symbol on the lower left of the pot. This new pot takes more ingredients but you will attract higher-level Pokémon.

Another thing to keep in mind as you are trying out new recipes is that the color of your ingredients matter. For the most part, the color of your dish affects what kind of Pokémon come looking for a snack. So if you are trying to find a specific Pokémon and you know that it's red, try adding only red ingredients to your pot.

Decorations

Whether you get them by completing expeditions or by buying them in the Poké Mart, decorating your Base Camp can have great effects on just about every aspect of your game. From simple XP boosts to increased ingredient drops, a decoration can be an effective method of getting where you want to be faster.

Back to the Base Camp

One happy little accident that I stumbled upon was an amazingly simple method of collecting new Pokémon. Any time you are out on an expedition and you encounter a new type of Pokémon in battle you should head back to your base camp. On occasion, you will see that Pokémon just hanging out in your Base Camp with a little exclamation mark above their head. Simply tap on that visiting Pokémon and they will become yours. It doesn't happen every time you encounter a new type of Pokémon but it happens often enough that it's worth heading back to camp just to check.

There's a lot to learn in Pokémon Quest, so we will be sure to update this article as we discover great new tips and tricks to help you in your own adventures. Good luck and happy questing!


from iMore - Learn more. Be more. http://bit.ly/2L75R2v
Powered by IOSCUBE

Don’t expect new hardware at WWDC 2018

WWDC 2018

Are the keys on your MacBook Pro falling off? Has your first-generation iPad Air slowed to a halt? If you were hoping to see new hardware products revealed at next week’s Worldwide Developers Conference (WWDC), you might be out of luck, according to Bloomberg‘s Mark Gurman.... Read the rest of this post here


"Don’t expect new hardware at WWDC 2018" is an article by iDownloadBlog.com.
Make sure to follow us on Twitter, Facebook, and Google+.


from iDownloadBlog.com http://bit.ly/2LKsGKu
via IOSCUBE

Microsoft killing its Groove Music app starting June 1

Microsoft announced that it would be killing its Groove Music streaming service last year, but promised it would continue investing in its Windows 10 application. However, that didn’t extend for iOS and Android.

more…


from 9to5Mac http://bit.ly/2JnqZEE
via IOSCUBE

Apple releases first iOS 11.4.1, tvOS 11.4.1, and macOS 10.13.6 public betas

Apple’s software release week continues today following iOS 11.4 and iOS 11.4.1 developer beta. This time its iOS 11.4.1 public beta, a bug fix update to the earlier release. tvOS 11.4.1 and macOS 10.13.6 public betas are also available.

more…


from 9to5Mac http://bit.ly/2J4tKHs
via IOSCUBE

How to download macOS High Sierra 10.13.6 public beta 1 to your Mac

macOS High Sierra, the next generation of Mac software, is now available as a public beta.

Apple has been offering public betas for macOS for a couple of years now as a way for those interested in testing out the upcoming software on their Macs, and providing feedback. If that's you, you'll need to sign up, enroll your Mac, download macOS High Sierra, and install it. It's not an overly complicated process, but we're here to walk you through it and, if you need it, a place to get extra help.

Apple occasionally offers updates to iOS, watchOS, tvOS, and macOS as closed developer previews or public betas for iPhone, iPad, Apple TV and Mac (sadly, no public beta for the Apple Watch). While the betas contain new features, they also contain pre-release bugs that can prevent the normal use of your iPhone, iPad, Apple Watch, Apple TV, or Mac, and are not intended for everyday use on a primary device. That's why we strongly recommend staying away from developer previews unless you need them for software development, and using the public betas with caution. If you depend on your devices, wait for the final release.

Note: This guide is being updated in real time. If you are seeing old content, refresh the page or come back later.

How to make a back up of your Mac

Before joining the public beta, you need to make a backup of your Mac. That way, if something goes wrong, of if you're simply not happy and want to revert to macOS Sierra, you can go right back to where you started.

Even if you back up every night, you'll want to make double, triple sure you're covered. So make a manual backup now. Here's how to do it with Time Machine. Even if you use something different or additional, like SuperDuper!, make sure you manually start a backup now.

  1. Click on the Time Machine icon in your Mac Menubar.
  2. Click on Backup now.


Let the backup finish before proceeding.

Note: If you're not adverse to the Terminal, you can also make a bootable Sierra installer as way to jumpstart reversion, if needed.

How to register your account for the macOS High Sierra public beta

If you've already joined a public beta for macOS in the past, you don't need to register again for macOS High Sierra. Simply sign in with the same Apple ID. If you've never joined a public beta before, you'll need to start by signing up with your Apple ID.

  1. Go to beta.apple.com in Safari on your Mac.
  2. Click on Sign up to get started. (If you've already signed up for a previous public beta, Click on Sign in and skip to "How to enroll your Mac", below.)
  3. Enter you Apple ID email address and password.
  4. Click Sign in.


Once you're signed up and signed in, it's time to start downloading.

How to enroll your Mac in the macOS High Sierra public beta

Downloading the macOS High Sierra public beta is done through the Mac App Store but requires a special code (like a promo or gift code). The code is provided for you on the website, but is also automatically entered for you when you click to begin the process.

  1. Go to beta.apple.com, if you're not there already.
  2. Click on the macOS tab, if it's not highlighted already.
  3. Click the Download macOS High Sierra public beta access utility button.
  4. Open the file from your Downloads window.
  5. Double-click the package to run the installer.

When the installer is finished downloading, the Mac App Store will automatically open to the Updates section. Click Update to download and install the public beta software. After the software has been downloaded, your Mac will automatically restart.

If the latest public beta does not appear on the Updates list, restart your Mac. Then, open the Mac App Store and click the Updates tab.

The public beta update can take a long time to finish downloading, depending on the size. You can check the status in the Updates tab of the Mac App Store.

How to install the macOS High Sierra public beta

The macOS High Sierra installer will automatically open when it's downloaded. If it doesn't, or if you prefer to do it later, you open Install macOS High Sierra Public Beta at any time via Spotlight or Launchpad, or from the Application folder in the Finder.

  1. Launch Install macOS High Sierra Public Beta app, if it's not launched already.
  2. Click Continue at the bottom.

  3. If prompted to make a backup, and you didn't before, click Continue in the dropdown. If you just made a backup, click Cancel.
  4. Click Continue at the bottom once your backup completes, or if you skipped it.
  5. Click Agree to accept the licensing terms.
  6. Click Agree again to confirm.

  7. Click on the drive you want to install onto (if you have multiple options; most people won't.)
  8. Click Install.
  9. Enter you administrator password and click OK.
  10. Click Restart (if your Mac doesn't restart automatically, or you don't want to wait).


Once your Mac reboots, it'll be running macOS High Sierra. There's a brief bit of setup you'll need to go through, however, as the system will have changed enough that it'll need your login to complete the update.

Once that's done, you'll be ready to rock macOS High Sierra.

What's new, and what if you don't like it?

To help ease your way into everything, make sure you check out our macOS High Sierra preview and our comprehensive macOS FAQ for all the details!

And, if you ultimately decide macOS High Sierra 10.13 isn't for you, you can still revert back to macOS 10.12.6.

Update May 31, 2018: Apple has released macOS Sierra 10.13.6 public beta 1 for members of the Beta Software Program. If you already have the macOS High Sierra public beta installed, head to Mac App Store > Updates and download away. If you've been waiting for beta 1 to get started with macOS 10.13.6 testing, now's the time to grab it!


from iMore - Learn more. Be more. http://bit.ly/2kdAnQa
Powered by IOSCUBE

How to download tvOS 11.4.1 public beta 1 to your Apple TV

Want to see what's going with tvOS 11.4.1? The public beta is now available. Here's how to download it!

Apple occasionally offers updates to iOS, watchOS, tvOS, and macOS as closed developer previews or public betas for iPhone, iPad, Apple TV and Mac (sadly, no public beta for the Apple Watch). While the betas contain new features, they also contain pre-release bugs that can prevent the normal use of your iPhone, iPad, Apple Watch, Apple TV, or Mac, and are not intended for everyday use on a primary device. That's why we strongly recommend staying away from developer previews unless you need them for software development, and using the public betas with caution. If you depend on your devices, wait for the final release.

tvOS 11.4.1 is coming later this year, though Apple has yet to say anything about it. Ahead of its arrival, Apple is letting interested users check it out beforehand with a public beta.

If you're interested in trying out the tvOS 11.4.1 public beta, just sign on up for Apple's Beta Software program and ready your device.

How to register for Apple's Beta Software Program

Registering for the Apple Beta Software Program is free and just requires an Apple ID.

  1. Head to beta.apple.com.
  2. Tap Sign up to get started with the program.
  3. Enter your Apple ID email address and password.
  4. Tap Sign In.
  5. Tap Accept to agree to the program's terms and conditions.

How to enroll your Apple TV in the tvOS 11.4.1 public beta

To enroll your Apple TV in the tvOS 11.4.1 public beta, you'll need to be signed into your Apple TV with the same Apple ID you used to register for the Beta Software Program.

  1. Open Settings on your Apple TV.
  2. Click Accounts.

  3. Click either iCloud, iTunes and App Store, or Game Center.

  4. Sign in with the same Apple ID email address and password that you used to register for the beta program.

  5. Click Menu on your Siri Remote.

  6. Click Menu on your Siri Remote again.
  7. Click on System.
  8. Click Software Updates.

  9. Turn Get Public Beta Updates on.

  10. Click Get Public Beta Updates.

  11. Click Agree.

You can turn off public beta updates by clicking the Get Public Updates button again under Software Updates.

How to install the iOS 11.4.1 public beta

  1. Open Settings on your Apple TV.
  2. Click on System.

  3. Click Software Updates.

  4. Click Update Software.

  5. Click Download and Install.

Questions?

If you've got any further questions about installing the tvOS 11.4.1 public beta, be sure to let us know in the comments.

Update May 31, 2018: Apple has just released tvOS 11.4.1 public beta 1 for members of its Beta Software Program. If you already have the tvOS 11 public beta installed, proceed to System > Software Updates and download away.


from iMore - Learn more. Be more. http://bit.ly/2ks6rMJ
Powered by IOSCUBE

How to download iOS 11.4.1 public beta 1 to your iPhone or iPad

Itching to try out iOS 11.4.1? The public beta is now available. Here's how to download it!

iOS 11.4.1 is coming down the road with a number of new features — features that need real-world testing before the software officially launches. As such, Apple is letting interested users check out iOS 11.4.1 and provide feedback before it goes into wide release.

If you're one of those interested users, however, you will have to go through the public beta download and install process. While it's not complicated, it is different. So, we're going to walk you through it and give you a place to ask questions if you need extra help.

Apple occasionally offers updates to iOS, watchOS, tvOS, and macOS as closed developer previews or public betas for iPhone, iPad, Apple TV and Mac (sadly, no public beta for the Apple Watch). While the betas contain new features, they also contain pre-release bugs that can prevent the normal use of your iPhone, iPad, Apple Watch, Apple TV, or Mac, and are not intended for everyday use on a primary device. That's why we strongly recommend staying away from developer previews unless you need them for software development, and using the public betas with caution. If you depend on your devices, wait for the final release.

How to make an archived backup of your iPhone or iPad

Before you begin, make sure you back up your iPhone or iPad. While the beta process is fairly straight forward, any time you make any significant change to your device you risk problems. And with your personal data, it's always — always! — better to be safe than sorry. Even if you back up every night, you'll want to make sure it's absolutely up-to-date.

  1. Plug iPhone or iPad into your Mac or Windows PC.
  2. Launch iTunes.
  3. Click on the iPhone or iPad icon in the menu bar when it appears.
  4. Make sure backup is set to This Computer. (And enable Encrypted backup — it's worth it!)
  5. Click on Back Up Now. (Click on Encrypt Backup and add a password — you want the security.)
  6. Back up Apps, if asked.


  7. Press Command, to open Preferences. (Or go to iTunes in the menu bar and click on Preferences.
  8. Click on the Devices tab.
  9. Option-click on your Backup and choose Archive.


Archiving will prevent your current backup from being overwritten by an iOS 11.4.1 backup in the future, should you want to revert for any reason.

How to register your account for the iOS 11.4.1 public beta

If you've already joined an Apple public beta in the past, you shouldn't need to register again for iOS 11.4.1; simply sign in with the same Apple ID. If you've never joined a public beta before, you'll start by signing up with your Apple ID.

  1. Go to beta.apple.com on the iPhone or iPad you want to enroll in the beta.
  2. Tap on Sign up to get started. (If you've already signed up for a previous public beta, tap on Sign in and skip to our "How to enroll your device" section below.)
  3. Enter you Apple ID email address and password.
  4. Tap Sign in.
  5. Tap Accept to agree to the terms and conditions.

Once you're signed up and signed in, it's time to start downloading.

How to enroll your iPhone or iPad in the iOS 11.4.1 public beta

Unlike regular iOS updates, where you just tap and start downloading, Apple is using configuration profiles to validate devices for the iOS 11.4.1 public beta. Here's how to install it.

Note: If you've been on a previous iOS public beta, you may need to remove the previous beta profile before installing the iOS 11.4.1 version. You can do so by going to Settings > General > Profile, selecting the iOS Beta Software Profile, and pressing Delete Profile.

  1. Go to beta.apple.com, if you're not there already.
  2. Tap the iOS tab, if it's not highlighted already.
  3. Tap on Download profile.
  4. Tap on Install in the upper right corner.
  5. Enter your Passcode.
  6. Tap on Install, this time to consent to the beta agreement. (Read it: There are risks to any beta.)
  7. Tap on Install at the bottom to confirm. (Yes, you need to be really sure.)
  8. Tap on Restart to reboot your device.

Once your iPhone or iPad has finished rebooting, it should start to download iOS 11.4.1 automatically. From this point on, the process is the same as any other iOS update.

How to install the iOS 11.4 public beta

To install the iOS 11.4.1 beta, you'll need to visit Software Update on your iPhone or iPad.

  1. Launch Settings from your Home screen, tap on General, then tap on Software Update.
  2. Once the update appears, tap on Download and Install.
  3. Enter your Passcode.

  4. Tap Agree to the Terms and Conditions.
  5. Tap Agree again to confirm.

Your iPhone or iPad will reboot to install iOS 11.4.1. There will be a couple progress bars going across the screen. Sit tight, and let everything finish.

How to get started with iOS 11.4.1 public beta

Once your iPhone or iPad reboots, it'll be running iOS 11.4.1. There's a brief bit of setup you'll need to go through, however, as the system will have changed enough that it'll need your login to complete the update.

  1. Tap Continue.
  2. Enter your Apple ID password. iCloud settings will update, so give it a minute.
  3. Tap Get Started.

Once that's done, you'll be on the Home screen and ready to rock iOS 11.4.1.

Update May 31, 2018: Apple has released iOS 11.4.1 public beta 1 for members of the Beta Software Program. If you already have a version of the iOS 11 public beta installed, proceed to Settings > General > Software Updates and download away.


from iMore - Learn more. Be more. http://bit.ly/2JSCaSQ
Powered by IOSCUBE

Best tower defense games for iPhone and iPad

Defend your tower at all costs with these great iPhone and iPad games!

Tower defense games have been a staple in the gaming world since games have been around — remember Space Invaders?

While the "towers" in the games can take on many forms, the act of defending something by using your cunning wit and excellent strategy never cease to be entertaining.

Here are my favorite tower defense games available on your iPhone and iPad!

Kingdom Rush

Kingdom Rush, and its collection of sequels exemplify fine-tuned, slick design found in the tower defense genre. Although the medieval aesthetic doesn't stand out from the crowd, this game buries a lot of complexity under the hood, allowing for a diverse range of tactics rather than just one winning strategy.

Although there are plenty of Kingdom Rush games out there, the "OG" Kingdom Rush is still my favorite.

Free - Download Now

Star Wars: Force Arena

I know someone named Luke recommending a Star Wars game may seem cliché, but even I was skeptical of Star Wars: Force Arena when it was first released. However, after playing it — a lot I may add — it quickly changed my mind.

The objective in Star Wars: Force Arena is pretty straightforward. Using a deck of six different cards — plus one leader — you spawn different units onto the battlefield in hopes of taking down your opponent's "towers" — three turrets and one shield generator. Each round lasts three minutes and whoever takes out the most towers wins, unless someone takes out the opposing shield generator, which causes them to win the match, regardless of how many turrets they have destroyed.

The leader cards are all famous characters from the Star Wars universe — Luke Skywalker, Darth Vader, Jyn Erso, and Orson Krennic to name some — and they honestly give this MOBA a different flavor than you find in other titles.

With a ton of different cards that you can power up and a vast amount of leaders to choose from, you can have hours and hours of fun regardless of what side of The Force you prefer to use.

Free - Download Now

Green the Planet

In all my years of gaming, I still have yet to find a game as charming as Green the Planet.

The cute setting makes for a compelling spin: You play as a band of aliens fighting to terraform and protect a planet, fending off meteors and decomposing comets in order to keep your future home (or humanity's future home?) safe from preemptive destruction.

Its much lighter and slower paced game than a lot of others in the genre, making it actually claiming to play, which is a nice change from the frantic battle-heavy themes most tower defense games have.

Free - Download Now

Plants vs. Zombies

It's hard not to give credit to Plant vs. Zombies for the popularity of tower defense titles on the iPhone and iPad, because Plants vs. Zombie is so massively popular and iconic for good reason.

Zombies slowing shuffle towards your house and you'll need to plant, flowers and other vegetation to fight them off. Don't let the cartoony graphics and bright and cheery visuals throw you off, this game can get fast, frantic, and difficult in the later levels.

Once again, Plants vs. Zombies has spawned multiple sequels and spin-offs, but the original is still my favorite.

Free - Download Now

Clash Roayle

If you've grown tired of Clash of Clans gameplay but still love the characters and world that the folks at Supercell have created, you should definitely check out Clash Royale. Unlock and upgrade troops, build your battle deck, and take on real-life opponents in real-time battles.

Join or create a clan and share cards and strategies with friends from around the world. You'll need to employ quick thinking and genuine strategy to win, so you'll be compelled to keep tweaking your decks by working in new cards. In-app purchases will be tempting and are essentially required to reach the upper echelons of the leaderboards, but there's still tons of fun to be had playing Clash Royale without spending a dime, and Supercell has done a great job supporting the game with updates and balancing.

Much like Star Wars: Force Arena, Clash Royale is a MOBA, meaning you play against real players!

Free - Download Now

Your favorites?

Of course, my list can't cover all the great tower defense games out there, so let me know what your favorites are by commenting down below!

Updated May 2018: Completely revamped the list with newer titles and familiar classics!


from iMore - Learn more. Be more. http://bit.ly/2JnJ2KV
Powered by IOSCUBE

Animal Crossing: Pocket Camp: Everything you need to know!

Nintendo brings the Animal Crossing kingdom to mobile with a sweet little camping adventure!

If you play Animal Crossing, you've probably always wished you could bring your pals with you on your iPhone or Android device. Well, I've got good news for you. Animal Crossing: Pocket Camp is just that — caring for your animal friends on the go! In this world, your fluffy friends are camping and it's your job to make sure they have everything they need while enjoying the great outdoors. Here's everything you need to know about Animal Crossing: Pocket Camp.

What's new in Animal Crossing: Pocket Camp

May 31, 2018: Digby's Artful Retreat comes to Animal Crossing Pocket Camp

There's a new garden event happening right now and it's very post-modern. Digby needs help finding busy buzzing creatures called Bumblecubes. Your job is to collect as many of them as possible by planting seasonal Art Blossoms in your garden that will attract them. Share your Bumblecubes with friends for rewards. Collect them to earn exclusive clothing and decorations from Digby. Trade your harvested Art Blossoms to Lloid in exchange for crafting materials and essence. The event is only 10 days long, from May 31 - June 9, so you'd better get going!

Digby's Artful Retreat: Everything you need to know!

What is Animal Crossing: Pocket Camp?

Similar to its console counterpart, Animal Crossing: Pocket Camp is a time-based simulation game where players act as a caretaker for a group of adorable animals. In the mobile spinoff, you're in charge of a campsite instead of a village.

You play a campsite manager whose job it is to create the ideal "glamping" spot for your animal friends. As you perform tasks around the campground, like harvesting fruit and helping out visitors, you'll earn materials that you can take to the blacksmith to turn into cool furniture. The more decked out your campsite gets, the more animals will visit.

You'll also earn "leaf tickets" (and other items), which are in-game currency that can be used to speed up how long it takes to harvest items, finish tasks, craft items, and more.

How much does it cost?

That's an interesting question. It doesn't cost anything to download and install the game. It also doesn't cost anything to start playing the game. It is, however, the type of game that uses in-game currency, which you can use to speed up how often you can collect items, craft furniture, and more. So, for some, this free game might cause them to go bankrupt (my best friend already said she won't even download the game because she's afraid she'll spend her entire paycheck on it).

For the most part, you can casually play the entire game without feeling compelled to spend real money. There are times when you might want to skip the wait time and use items that help speed up growth processes and the like. Most items that speed things up cost Leaf Tickets, which aren't as fast to replenish as Bells. If you run out of Leaf Tickets, you might be hovering over that "Buy Now" button. Especially when it comes to getting character-themed fortune cookies within the time frame they're available. So far, I've spent less than $10 since it's launch in November 2017.

What devices can I play it on?

Animal Crossing: Pocket Camp is available on iOS and Android devices. As long as you sign in with your Nintendo Account, your game progress can be saved across devices.

  • Animal Crossing: Pocket Camp on the App Store - Download now
  • Animal Crossing: Pocket Camp on Google Play - Download now

How do I play?

ACPC is simple to play, but it's important to strategize your plan so you don't make mistakes early on that you wish you could go back and fix. We've got a comprehensive beginner's guide and a list of tips and tricks to help you get the most out of your game.

Animal Crossing: Pocket Camp - Beginner's Guide

Animal Crossing: Pocket Camp - Tips and Tricks

Animal Crossing: Pocket Camp - How to get rare flowers

Animal Crossing: Pocket Camp villager list and the materials they give

How to get lots of cotton (or any material) in Animal Crossing: Pocket Camp

Tips and tricks for getting the most from Gulliver's Cargo Ship

Everything you need to know about Tommy's Fortune Cookie Shop in Animal Crossing: Pocket Camp

Any questions?

Do you have any questions about Animal Crossing: Pocket Camp that you'd like us to look into? Put them in the comments and we'll dig up the answers for you!


from iMore - Learn more. Be more. http://bit.ly/2hPUeAB
Powered by IOSCUBE

Netflix testing 10-second skimming gesture & unobtrusive volume slider in iOS app

Netflix iPhone unobtrusive volume slider

Netflix appears to be testing a new playback interface that includes an unobtrusive YouTube-like volume slider centered at the very top of the interface along with other enhancements, such as the ability to double tap on the right edge of the screen to fast forward 10 seconds and on the left side to rewind 10 seconds.... Read the rest of this post here


"Netflix testing 10-second skimming gesture & unobtrusive volume slider in iOS app" is an article by iDownloadBlog.com.
Make sure to follow us on Twitter, Facebook, and Google+.


from iDownloadBlog.com http://bit.ly/2kDg8bq
via IOSCUBE

Animal Crossing: Digby's Artful Retreat: Everything you need to know!

Animal Crossing: Pocket Camp's next great garden event has begun! Collect worker and honey Bumblecubes and trade them to Digby to turn your Campsite into a modern mecha.

Digby has come to visit your Animal Crossing: Pocket Camp Campground, but he's here on a mission. He wants to collect Bumblecubes (bees with a love for modern art). He needs your help to collect as many as possible. Digby's Artful Retreat runs from May 30 - June 9, so you don't have a whole lot of time to get through the entire event.

Here's everything you need to know about how to catch Bumblecubes and earn all of Digby's special Campsite decorations and clothing items.

The basics

The goal is to catch as many Bumblecubes as possible. You'll earn rewards for catching a certain number for each task. For example, once you've completed the first Bumblecube task, you'll get a green modern chair.

To catch an Bumblecube in your garden, plant seasonal white or blue Art Blossom seeds. You can buy white Art Blossom seeds from Lloid and you can earn blue Art Blossom seeds by completing requests.

You'll also earn rewards for sharing Bumblecubes with friends. Visit a friend's garden and leave an Bumblecube on a flower (hint: It doesn't have to be an Art Blossom) for your friend. Most of the time (but not every time), Digby will reward you with seeds whenever you share.

You'll also earn seeds from completing tasks around the campground. So, be sure to continue your regular camper quests to earn those extra seeds.

The event takes place in two waves with three different types of Art Blossoms and four different types of Bumblecubes with four different runs of quests.

Wave 1: Worker and honey Bumblecubes

The first wave of Digby's Artful Retreat starts on May 30 and runs until the end of the event on June 9. During this time, you'll be able to collect worker and honey Bumblecubes from seasonal white and blue Art Blossoms. Below are the tasks and rewards for the first wave.

worker Bumblecubes

  • Collect 3 - Green modern-art chair (first one)
  • Collect 6 - 20 flower food
  • Collect 9 - Yellow modern-art chair (first one)
  • Collect 12 - 5 Leaf Tickets
  • Collect 15 - Green modern-art chair (second one)
  • Collect 20 - 10 modern essence
  • Collect 25 - Red modern-art chair (first one)
  • Collect 30 - 60 flower food
  • Collect 40 - Yellow modern-art chair (second one)
  • Collect 60 - 15 natural essence
  • Collect 70 - 15 elegant essence
  • Collect 80 - Honeycomb table

honey Bumblecubes

  • Collect 3 - 20 flower food
  • Collect 6 - Red modern-art chair (second one)
  • Collect 9 - 5 cute essence
  • Collect 12 - Yellow modern-art chair (third one)
  • Collect 15 - Color-block shirt (first one)
  • Collect 20 - Red modern-art chair (third one)
  • Collect 25 - 60 flower food
  • Collect 30 - 10 harmonious essence
  • Collect 40 - Green modern-art chair (third one)
  • Collect 50 - Color-block shirt (second one)
  • Collect 60 - 20 Leaf Tickets

Wave 2: Garden and queen Bumblecubes

The second wave of Digby's Artful Retreat starts on June 4 and runs through the end of the event on June 9. You'll have less time to collect garden and queen Bumblecubes from orange Art Blossoms, which only become available when the second wave starts. Luckily, you can trade white and blue Art Blossoms seeds for orange Art Blossom seeds after the second wave starts.

At this time, we don't know the tasks and rewards for the second wave. I'll update this post when the second wave hits.

Important note: You can't keep Bumblecubes after the event ends, so don't try to stock up. Share Bumblecubes with friends as often as possible and trade stocks of Art Flowers to Lloid in exchange for flower beds and crafting materials.

Plant and harvest regularly

Bumblecubes spawn randomly on flowers. If you plant 10 flowers, for example, you might only spawn five or six Bumblecubes.

Bumblecubes will only be attracted to a freshly bloomed flower. It won't leave once bloomed — you can take your time trying to catch it, but new Bumblecubes will not spawn on an existing flower.

If you don't see a Bumblecube on a new bloom, you'll never see one (unless a friend drops one for you). Harvest it and plant a new one. There is almost never a reason to leave a flower unharvested in your garden. Almost never...

Leave a couple of un-harvested flowers behind so your friends can share Bumblecubes with you — maybe just five. If you harvest everything, your garden won't have any sharable blooms for three hours. This is important for both you and your friends. You get additional Bumblecubes to meet your event goals and your friends get seeds they can plant. Do everyone a favor and leave a few flowers un-harvested in your garden.

You can see whether a Bumblecube in your garden is from a friend by checking the Visitors section of your Friend list. If Penny left you a Bumblecube, it'll appear under her name. I always check the Visitors list first and repay friends for leaving me Bumblecubes by doing the same for them.

You can also see if your friends' flowers have room for Bumblecube sharing by taping their name in the Friends list. If there is room for your Bumblecube, it'll show "Sharing: [x number] Ready" next to their name. This makes it easier at a glance to know who to visit now and who to check back with later.

Stop hoarding your Bumblecubes, give them away!

Share your Bumblecubes with friends. Hoarding them does you no good. Give them to friends in order to earn more seeds and friend powder from Digby. You'll get decorations and clothes from Digby for the Bumblecubes you catch, but you don't have to keep them in your inventory.

Your progress is tallied in the Event section of your garden. When you give Bumblecubes away, the total doesn't drop. They also disappear from your inventory after the event ends, so keeping them to yourself doesn't do anyone any good.

When you drop off Bumblecubes to your friends, Digby will give you rare seeds that you can take back to your garden to plant. He'll reward you with about a 70% return on your friendly gesture. This isn't exact, however. Sometimes, he doesn't give you any.

Pro Tip: You can share Bumblecubes with friends on their non-rare plants, too. Help friends out that haven't planted any Art Blossoms yet!

Set a timer to check your garden

Though you should be able to get all of Digby's decorations fairly easily with regular gameplay, you don't want to miss out on any opportunities to water and harvest your plants in a timely manner. To make sure you're always on the right track, set a timer for every three hours. You don't have to run through the entire campground's requests, but you can make sure to collect those flowers and replant as soon as possible.

Don't ask for Lloid's help until the second wave hits

Asking for Lloid's help will guarantee that you'll catch a Bumblecube from the flower, but it comes at a hefty price (10 Leaf Tickets for each one). Based on the last garden event, you won't need his help catching Bumblecubes from the first wave. There's plenty of time for them.

The second wave, however, is shorter and you're still working with seeds from the first wave. So you're not getting as many orange Art Blossom seeds as you need — added to the fact that garden and queen Bumblecubes spawn and are catchable at a much lower rate.

Save your Leaf Tickets for Wave 2. I rarely have to spend any Leaf Tickets in the Garden events, but when I do, it's usually in the second wave, trying to reach those last few goals.

Plant a garden full of flowers before bed

If you plant a garden full of flowers before you go to bed, you'll wake up in the morning with a fresh set of Art Blossoms and Bumblecubes.

Planting flowers that bloom overnight will also help your friends that live across the globe. While you're sleeping, they're playing, and they'd love to drop off a Bumblecube or two in your garden.

Hoard your flowers!

You can trade harvested flowers to Lloid for flower boxes and crafting materials. Even if you've collected all of the Bumblecubes you need for the event, keep planting so you can harvest flowers and exchange them for much-needed crafting materials.

I also recommend trading as many flowers as possible for essences as many times as you can, since those items are hard to come by in the game and are expensive to replace with Leaf Tickets if you want to craft something when you don't have enough materials.

Once the event ends, your rare flowers will stay in your inventory, where you can give them to animals that request special items during tasks. So don't go selling off unused flowers. Keep them in your inventory.

Previous garden events

We're keeping track of previous events to give you an idea of the patterns (and what you've missed out on if you weren't around for a garden event). Check below to see what previous garden events have taken place in Animal Crossing Pocket Camp.

Fruit Party with Katie

** Wave 1: Appleflitters and Green Appleflitters**

The first wave of Fruit Party with Katie starts on May 4 and runs until the end of the event on May 13. During this time, you'll be able to collect Appleflitters and Green Appleflitters from seasonal green and red strawberries. Below are the tasks and rewards for the first wave.

Appleflitters

  • Collect 3 - Watermelon Shorts
  • Collect 6 - 20 Flower Food
  • Collect 9 - 5 Sporty Essence
  • Collect 12 - 5 Leaf Tickets
  • Collect 15 - Fruit Cracker Rug (first one)
  • Collect 20 - 10 Cute Essence
  • Collect 25 - 10 Harmonious Essence
  • Collect 30 - 60 Flower Food
  • Collect 40 - Fruit Floor Lamp (first one)
  • Collect 60 - 15 Natural Essence
  • Collect 70 - 15 Elegant Essence
  • Collect 80 - Apple Stem

Green Appleflitters

  • Collect 3 - 20 Flower Food
  • Collect 6 - Watermelon Polo Shirt
  • Collect 9 - 5 Cute Essence
  • Collect 12 - 5 Cool Essence
  • Collect 15 - Fruit Cracker Rug (second one)
  • Collect 20 - 10 Rustic Essence
  • Collect 25 - 60 Flower Food
  • Collect 30 - 10 Hip Essence
  • Collect 40 - Fruit Salad Table
  • Collect 50 - Fruit Floor Lamp (second one)
  • Collect 60 - 20 Leaf Tickets

Wave 2: Silver Appleflitters and Gold Appleflitters

The second wave of Fruit Party with Katie starts on May 8 and runs through the end of the event on May 13. You'll have less time to collect Silver and Gold Appleflitters from pink strawberries, which only become available when the second wave starts. Luckily, you can trade green and red strawberry seeds for pink strawberry seeds after the second wave starts. Below are the tasks and rewards for the first wave.

Silver Appleflitters

  • Collect 3 - 5 Sporty Essence
  • Collect 6 - 5 Cool Essence
  • Collect 9 - Fruit Bread Screen (first one)
  • Collect 12 - 5 Rustic Essence
  • Collect 15 - 60 Flower Food
  • Collect 20 - Fruit Floor Lamp (third one)
  • Collect 25 - 10 Harmonious Essence
  • Collect 30 - Fruit Bread Screen (second one)
  • Collect 40 - Fruit Sandwich Bed
  • Collect 50 - 25 Leaf Tickets

Gold Appleflitters

  • Collect 2 - Fruit Bread Screen (third one)
  • Collect 6 - 5 Hip Essence
  • Collect 9 - 15 Leaf Tickets
  • Collect 12 - 60 Flower Food
  • Collect 15 - Fruit Cracker Rug (third one)
  • Collect 20 - Fruit Tart Dress
  • Collect 25 - Fruit Bread Screen (fourth one)
  • Collect 30 - Fruit Cracker Rug (fourth one)
  • Collect 35 - Fruit Tart Hat
  • Collect 45 - 1 Sparkle Stone

Important note: You can't keep Appleflitters after the event ends, so don't try to stock up. Share Appleflitters with friends as often as possible and trade stocks of strawberries to Lloid in exchange for flower beds and crafting materials.

Zipper's Wonderland Event

Wave 1: Striped and floral Scramblers

The first wave of Zipper's Wonderland event starts on March 30 and runs until the event ends on April 8. During this time, you'll be able to collect rare striped and floral Scramblers from seasonal pink and orange heart roses. Below are the tasks and rewards for the first wave.

Striped Scramblers

Collect 3 - Yellow Tea-Party Chair (first one) Collect 6 - 20 Flower Food Collect 9 - Pink Tea-Party Chair (first one) Collect 12 - 5 Leaf Tickets Collect 15 - Tea Party Balloons (first one) Collect 20 - 10 Hip essence Collect 25 - Green Tea-Party Chair (first one) Collect 30 - 60 Flower Food Collect 40 - Tea-Party Balloons (second one) Collect 60 - 20 Cute essence Collect 70 - Wonderland Screen Collect 80 - Wonderland Rug (first one)

Floral Scramblers

Collect 3 - 20 Flower Food Collect 6 - Green Tea-Party Chair (second one) Collect 9 - 10 Cute Essence Collect 12 - Wonderland Cat Shirt Collect 15 - Yellow Tea-Party Chair (first one) Collect 20 - Wonderland Cat pants Collect 25 - 60 Flower Food Collect 30 - Pink Tea-Party Chair (second one) Collect 40 - Wonderland Rug (second one) Collect 50 - Wonderland Cat hood Collect 60 - 20 Leaf Tickets

Wave 2: Dapper and majestic Scramblers

The second wave of Zipper's Wonderland event starts on April 3 and runs until the event ends on March 8. You have less time to collect rare dapper and majestic Scramblers from blue heart roses, which only become available when the second wave starts.

Important note: You can't keep rare Scramblers or seasonal flowers after the event ends, so don't try to stock up. Share Scramblers with friends as often as possible and trade stocks of seasonal roses to Lloid in exchange for flower beds and crafting materials. Don't hold onto anything.

Leif's Spring Flowers event

Wave 1: Pink and Yellow Ladybugs

The first wave of Leif's Spring Flowers event starts on February 27 and runs until the event ends on March 8. During this time, you'll be able to collect rare pink and yellow ladybugs from seasonal white clover and yellow sleeping beauty flowers. Below are the tasks and rewards for the first wave.

Pink Ladybugs

  • Collect 3 - Flower Canal (first one)
  • Collect 6 - 20 Flower Food
  • Collect 9 - Floral Canal (second one)
  • Collect 12 - 5 Leaf Tickets
  • Collect 15 - Spring Flower Crown
  • Collect 20 - 10 Hip essence
  • Collect 25 - 15 Cool essence
  • Collect 30 - 60 Flower Food
  • Collect 40 - Floral Stepping Stones (first one)
  • Collect 60 - 30 Natural essence
  • Collect 70 - Shamrock Blazer
  • Collect 80 - Floral Canal (third one)

Yellow Ladybugs

  • Collect 3 - 20 Flower Food
  • Collect 6 - Floral Canal Corner (first one)
  • Collect 9 - 10 Cute Essence
  • Collect 12 - Floral Canal Corner (second one)
  • Collect 15 - 10 Hip essence
  • Collect 20 - Floral Stepping Stone (second one)
  • Collect 25 - 60 Flower Food
  • Collect 30 - Floral Canal Corner (third one)
  • Collect 40 - Spring Garden (foreground of Campground)
  • Collect 50 - Round Spring Flower Bed (first one)
  • Collect 60 - 20 Leaf Tickets

Wave 2: Purple and Navy Ladybugs

The second wave of Leif's Spring Flowers event starts on March 3 and runs until the event ends on March 8. You have less time to collect rare purple and navy ladybugs from pink sleeping beauty flowers, which only become available when the second wave starts.

Purple Ladybugs

  • Collect 3 - 5 Sporty essence
  • Collect 6 - 10 Cute essence
  • Collect 9 - Giant Clovers (first one)
  • Collect 12 - Floral Canal (fourth one)
  • Collect 15 - 60 Flower food
  • Collect 20 - Round Spring Flower Bed (second one)
  • Collect 25 - Floral Stepping Stone (third one)
  • Collect 30 - Giant Clovers (second one)
  • Collect 40 - Floral Stepping Stone (fourth one)
  • Collect 50 - 25 Leaf Tickets

Navy Ladybugs

  • Collect 3 - Floral Canal (fifth one)
  • Collect 6 - Floral Canal Corner (fourth one)
  • Collect 9 - 15 Leaf Tickets
  • Collect 12 - 60 Flower Food
  • Collect 15 - Giant Windflower (first one)
  • Collect 20 - Round Spring Flower Bed (third one)
  • Collect 25 - Giant Windflower (second one)
  • Collect 30 - Floral Swinging Bench
  • Collect 35 - Spring Garden (middle ground of Campground)
  • Collect 45 - 1 Sparkle Stones

We're including information about previous garden events so you can catch up on what's gone on and study up on what to expect in the future.

Lottie's Gothic Festival

  • Wave 1: Gothic and golden gothic bats

The first wave of Lottie's Gothic Rose Festival starts on February 1 and runs until the event ends on February 9. During this time, you'll be able to collect rare gothic and golden gothic bats from gothic red and gothic purple roses.

  • Wave 2: Ruby and diamond gothic bats

The second wave of Lottie's Gothic Rose Festival starts on February 5 and runs until the event ends on February 9. You have less time to collect rare ruby and diamond gothic bats from gothic fusion roses, which only become available when the second wave starts.

Important note: You can't keep rare bats or seasonal flowers after the event ends, so don't try to stock up. Share bats with friends as often as possible and trade stocks of roses to Lloid in exchange for flower beds and crafting materials. Don't hold onto anything.

Rover's Garden Safari

  • Wave 1: Diamond and Topaz butterflies

The first wave of Rover's Garden Safari event starts on January 11 and runs all the way through until January 21, when the event ends. During this time, you'll be collecting rare Diamond and Topaz butterflies by planting blue and red dahlia seeds.

  • Wave 2: Winter and Gold butterflies

The second wave of Rover's Garden Safari event starts on January 16 and runs until the event ends on January 21. You have less time to collect rare Winter and Gold butterflies from white dahlias, which only become available when the second wave starts.

Important note: You can't keep rare butterflies or seasonal flowers after the event ends, so don't try to stock up. Share butterflies with friends as often as possible and trade stocks of dahlias to Lloid in exchange for flower beds and crafting materials. Don't hold onto anything.

Any questions?

Do you have any more questions about Rover's Garden Safari event in Animal Crossing: Pocket Camp? Put them in the comments and I'll help you out.


from iMore - Learn more. Be more. http://bit.ly/2DP2b23
Powered by IOSCUBE

Steve Jobs would never approve this toxic portrait

The late Steve Jobs has inspired artists to immortalize him in bronze, on canvas, the silver screen and even the opera stage. There was even a guy who injected paint into bubble wrap to create a Jobs portrait. But the oddest may just be a Jobs likeness made by a smoker arranging ash in an […]

(via Cult of Mac - Tech and culture through an Apple lens)


from Cult of Mac http://bit.ly/2xsMtuI
via IFTTT

How to add Facebook Events to iPhone calendar (and delete them too)

Add Facebook Events to iPhone Calendar

The Facebook Events feature is a great way to keep track of what’s going on in the world around you, including upcoming concerts, community functions, birthdays, and more. Thanks to a web-based import feature, you can now add Facebook Events to your iPhone calendar. You can also remove these calendars from your devices as you can see below. ... Read the rest of this post here


"How to add Facebook Events to iPhone calendar (and delete them too)" is an article by iDownloadBlog.com.
Make sure to follow us on Twitter, Facebook, and Google+.


from iDownloadBlog.com http://bit.ly/2snpv3f
via IOSCUBE

Hands-on: CalDigit T4 Thunderbolt 3 RAID external storage enclosure [Video]

I’ve covered tons of Thunderbolt 3-enabled devices over the years, and it’s become clear that CalDigit is one of the leaders in this space, especially when it comes to docks and external drive enclosures. The company’s latest product, the T4 RAID storage enclosure, starts at under a grand, comes with dual Thunderbolt 3 ports, and brings 4-bay external storage, DisplayPort connectivity, and Power Delivery to the table.

How might the die-cast aluminum RAID storage enclosure fit in a MacBook Pro user’s workflow? Watch our hands-on video walkthrough for the lowdown. more…


from 9to5Mac http://bit.ly/2sm3x0y
via IOSCUBE